Every hand in Flesh and Blood is a bet. If you declare no blocks, choosing to take a bunch of damage so that you can play out a full four-card hand on the following turn, you’re betting that your damage output will exceed the damage you’re taking. Conversely, if you block out with your entire hand, you’re betting that the life preserved and tempo lost by blocking is worth more than the damage or effects you would have been able to threaten had you kept some cards to play on your turn. Furthermore, you’re betting that your next hand will be “better” in some way, unlocking the ability to take back the tempo and go on the offensive.
And that’s just the tip of the iceberg. There are often multiple bets within a turn: blocking with equipment instead of cards, choosing when to use key equipment abilities, playing around attack reactions, holding a card in arsenal. They're all bets.
Underneath the hood, we are really talking about probability - the probability that we are going to have certain cards in hand, or that our opponents are going to behave in a certain way. Variance shows up in the form of a shuffled deck, drawn cards, a die roll to see who goes first, and many card effects. We are constantly betting against the variance in our own decks - as well as our opponent’s - in a struggle to win the game.
I want to explore a foundational card game probability function called hypergeometric distribution, and discuss some of the implications, both for deck building as well as in-game decision making. Despite its intimidating name, it’s really quite a simple concept! But its uses are many.
When we talk about bets, we are really talking about probability.
In Part I- which you're reading now- I’ll explore what hypergeometric distribution is, why it matters, and how you can use it to inform critical game-time decisions, as well as your strategies for particular matchups.
If you want to go deeper, I've followed up with a Pro Series Part II, where I explore some of the ways you can use hypergeometric distribution to better inform your deckbuilding and sideboards.
By the end of Part 1, you’ll be able to:
1. Understand the value in keeping track of the current turn number during play and how this awareness can be leveraged mathematically in your decision-making to help make better bets at critical game moments.
2. Know roughly how likely it is that you or your opponent will draw “key" cards, and how that might impact your offensive and defensive strategies.
Keeping Track of Time
Before we start calculating probabilities, let’s begin by making sure we understand how important it is to keep track of the current turn during gameplay. It will be foundational to our ability to calculate probabilities, as I’ll discuss shortly. But it’s also important for knowing when the second cycle is approaching.
If you want to improve as a player, it will help to start paying attention to what turn it is. This seems obvious, but be honest with yourself. Do you consistently know the moment in-game that you’re going to hit your second cycle (the moment you start drawing cards that you’ve pitched to the bottom of your deck)? I’m willing to admit, there have been many games where I will be in my second cycle, and not realize it until a few turns later. For beginners, this is understandable; if you’ve been playing for a while, you don’t want to lack this kind of awareness.
Do you consistently know the moment in-game that you’re going to hit your second cycle?
Let’s do the math. How many turns will it take to reach your second cycle? Assuming a standard CC deck size of 60, and standard “efficient” play of playing out all four cards in your hand each turn, it will take 15 turns to get through 60 cards. The math here is simple: 60 cards / 4 cards drawn per turn.
(Of course there are variables here. Lots of decks draw additional cards, for example. Lots of decks play cards that shuffle their deck, so the idea of a second cycle here is a bit different. Nonetheless, this baseline is important to acknowledge as a player.)
In Blitz, with the same assumptions, it will take 10 turns before you start drawing cards in your second cycle (40 cards / 4 cards drawn per turn).
In Limited play, the minimum deck size is 30 cards. This means that after a measly 7 turns, you’re already drawing cards that you’ve pitched. This is especially important to understand, as Limited decks are less powerful than constructed decks, and games will often go longer since they are more evenly matched in a traditional back-and-forth exchange of blocking and attacking. Pitch stacking can be key here! Pitching a powerful red or two in the early game just might give you the edge against an opponent who leaves themselves nothing but blues beyond Turn 7. Perhaps more importantly, having an awareness of what your opponent has pitched - coupled with the awareness of what turn it is in the game - can help you forecast the level of threat that your opponent is going to able to dish out in Turn 7 and beyond. This is really useful stuff!
While it may sound obvious when pointed out, memorizing these turn numbers for each format - 15, 10, and 7 - will give your brain a fantastic baseline awareness of the game.
Every time you fill your hand, add a turn to your mental counter. In practice games, use a die or a piece of paper to keep track. While record keeping is not legal in tournament play, this is a great way to force yourself to pay attention to this aspect of the game and to start improving your awareness. With time and practice, you will develop a better feel and be able to bear the mental load of remembering what turn it is.
But knowing when your second cycle is approaching is only half the reason to keep track of the current turn. If you know what turn it is, you can use hypergeometric distribution to calculate the probability of drawing a card you’re looking for, or perhaps more importantly, the likelihood that your opponent has a given card in hand or arsenal. The ability to do this is entirely dependent on knowing how many cards you’ve “seen” from the deck up to that point in the game - and unless you can count cards in your head, the current turn number is the best marker we can get. 1 turn = 4 cards seen.
Where is it?! Where's that card?!
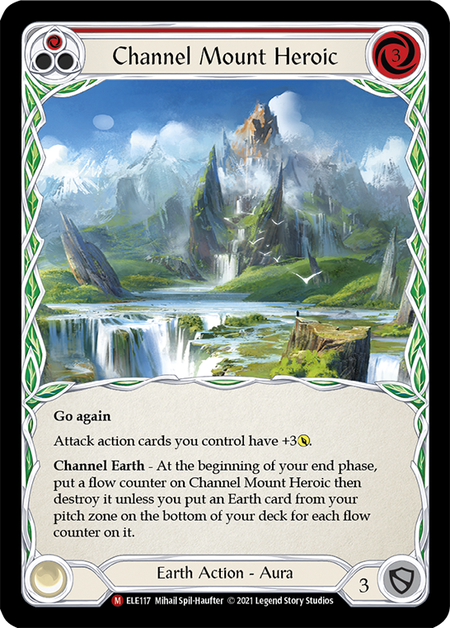
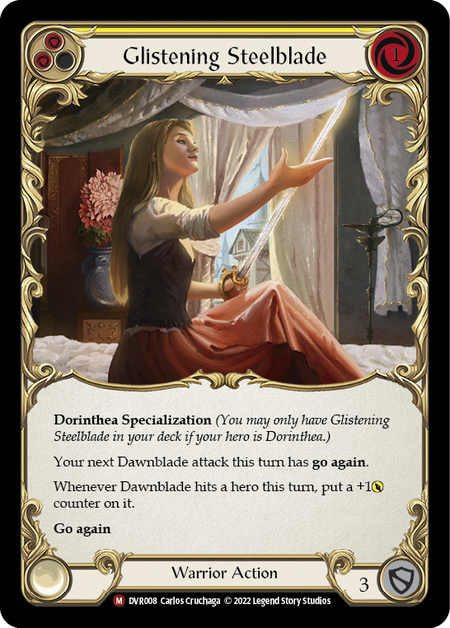
What are the chances that you will draw “that one card” you’re really looking for? If you’re Rhinar, what are the chances you’ll draw a Bloodrush Bellow? How about drawing two of them? Dorinthea wants her Glistening Steelblade and her Steelblade Supremacy. Briar wants her Channel Mount Heroic. So how soon are you likely to draw one?

More importantly, what about your opponent? What are they chances they have the one card that is going to ruin your game at a pivotal moment? Perhaps you’re making a key block against Rhinar, deciding if you should go down to 2 or 4 life. If you go down to 2, he can kill you with a Reckless Swing on the following turn when you attack. But will he draw it? Has he pitched one this game already? Are you paying attention? Wouldn’t it be nice if you could make an informed decision based on real mathematical probability instead of just… hoping?
The key idea here is to understand that the probability of drawing a particular card from your deck changes with each subsequent card that you draw. If it’s CC, and I’m hoping for a Bloodrush Bellow on the first turn of the game, I’m going to draw 4 cards. There are 60 cards in the deck. What is the percentage that I draw one or more copies? Hypergeometric distribution holds the mathematical answer to this question: 18.9%.
But how did we calculate this? We need to know four pieces of information:
1. Total population size (how many “unseen” cards in our deck).
2. Total items of interest in the population (3 “unseen” Bloodrush Bellows in the deck).
3. Sample size (4 cards that we draw each turn).
4. The number of successes we’re looking for (1 or more Bloodrush Bellows).
With these 4 pieces of information, we can calculate the probability of drawing a given card during a given game state (turn). Don’t worry, you don’t need to do the math manually, you can use free online calculators like this one.
This is why knowing what turn it is fundamental. If we assume that a single turn is worth 4 “seen” cards in the deck, and we are paying attention to the key cards that have been played or pitched (whether ours or the opponent’s), we can use these 'mystical' powers to our advantage.
Below are the full probability charts for CC and Blitz. These charts answer the question, “What is the probability that I will draw 1 or more copies of a given card on a given turn, assuming I have maximum copies (2 or 3) of that card in deck?”
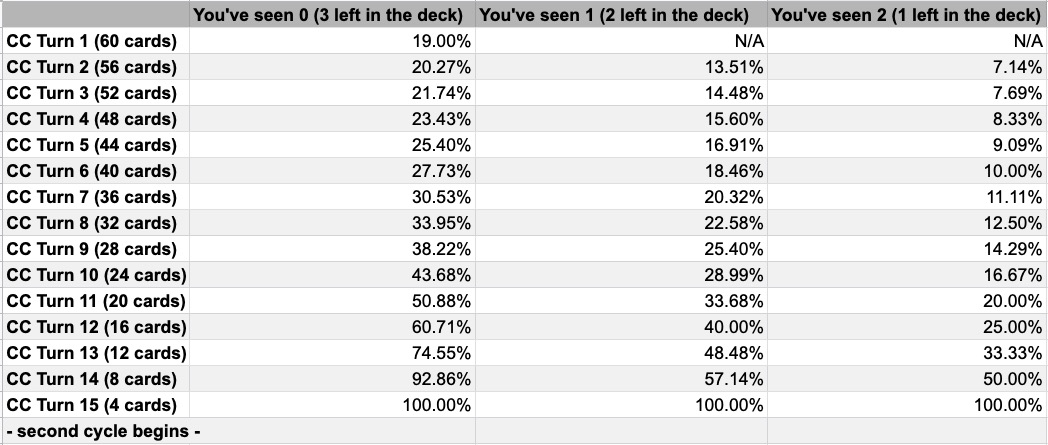
Chart 1A - CC probability of drawing 1 or more of a given card, assuming max copies (3) in deck
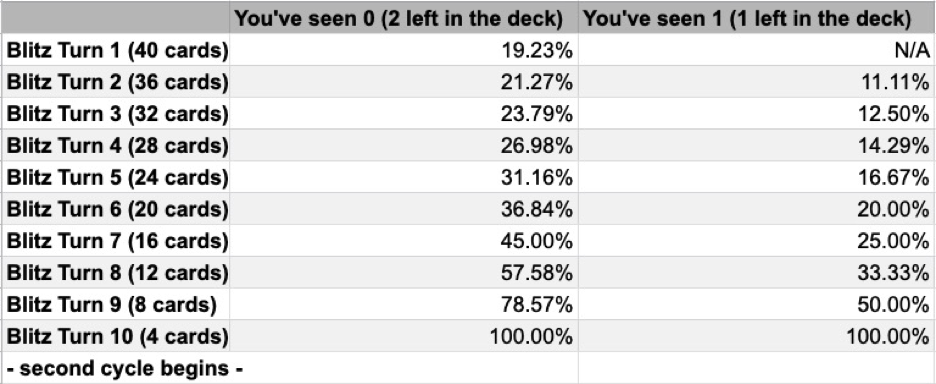
Chart 1B - Blitz probability of drawing 1 or more of a given card, assuming max copies (2) in deck
Cumulative Probability: We Get Many Attempts!
The previous charts show us probability on a given turn. But the probability over the course of many turns is actually higher, since we are getting multiple four card draws from the same deck, not just one. Essentially, your chances of drawing a single blue ball from a bag of 100 red balls will cumulatively increase with each subsequent draw, no matter how initially unlikely.
Below are the cumulative probability charts for CC and Blitz. These charts answer the question: “what is the probability that I will draw 1 or more copies of a given card by a given point (turn) in the game, assuming I have maximum copies (2 or 3) in deck?”
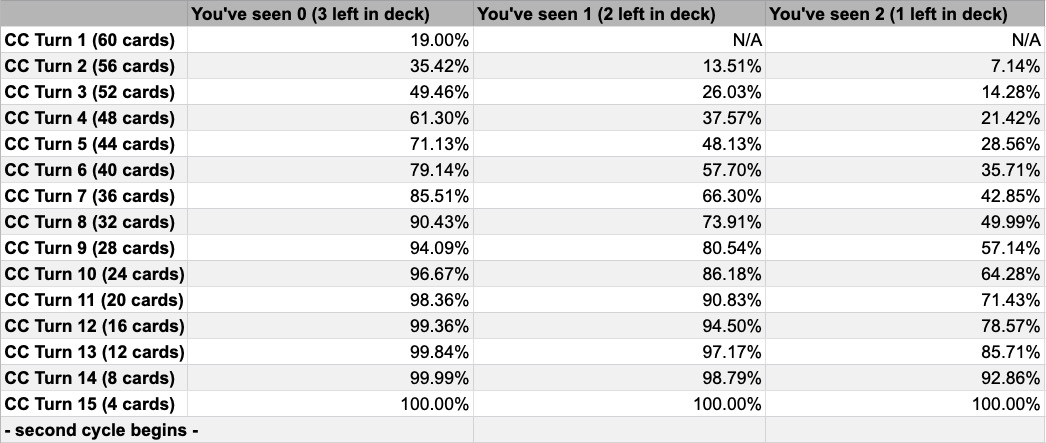
Chart 2A - CC cumulative probability across many turns of drawing 1 or more of a given card, assuming max copies (3) in deck
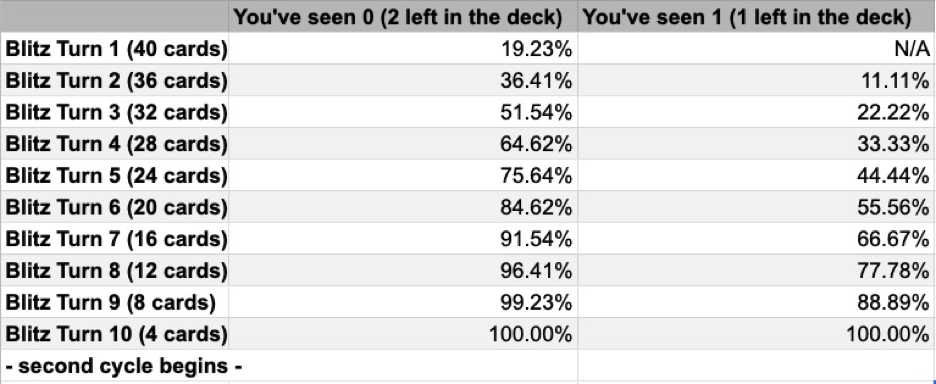
Chart 2B - Blitz cumulative probability across many turns of drawing 1 or more of a given card, assuming max copies (2) in deck
So what? How can I use this information?
Of course, in competitive games, we cannot pull out these charts, start counting cards, and come up with an exact probability number. Instead, I find it helpful to see this data in its totality and then work at internalizing it. Professional poker players do this all the time, albeit with a fixed deck of cards. In our case, instead of memorizing the charts, we can fill our minds with some of the common scenarios and begin internalizing general probabilities to help inform key game time decisions. Like anything, repetition is mastery.
In my practice games, I’ve begun to use these charts and practice performing from-memory calculations (based on the current turn and my estimate of how many cards deep into the deck the game is) whenever I’m facing a key decision and I want to know the probability of my opponent having a particular card.
So what are some of the situations? This is by no means an exhaustive list, but here are some things to consider:
Evaluating the chance that your opponent has a key reaction card.
This is probably what I use the charts for the most. Let’s say I’m playing against a Warrior in Blitz and we’re getting toward the mid-game (start of turn 4). My opponent has already played one of their red Steelblade Shunts. Based on what I know about Warrior, I’m guessing they’re not running a whole lot of other defense reactions. It’s possible they’re also running x2 blue Shunts, but I haven’t seen any up to this point (opponent has played/pitched 12 cards across 3 turns thus far). If I’m trying to sequence my attacks and land key on-hits in a way that could play around Shunt, it would be helpful to know the probability that they have the card in hard.
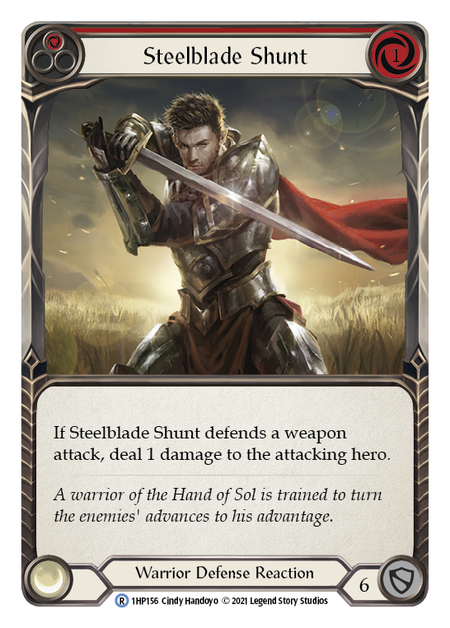
Consulting Chart 1B, we can see that the chance of having another red Shunt on a Turn 4 draw is a very improbable 14.29%, and the cumulative chance (Chart 2B) of drawing the 2nd copy on Turn 4 is 33.33%. This is very helpful information as I plan how to sequence my attacks. Additionally, if they are running blue Shunts, there’s a 26.98% chance that they’d have drawn one on turn 4. Still - the odds are in my favor. Given this data, I would safely proceed to play as if they don’t have the Shunt.
Now, if they’ve been sitting on a card in arsenal over the course of a few turns, my gut might chime in. Unfortunately, our charts can’t help us here. The human player must make a decision. Are they holding the Shunt in arsenal? We know it’s unlikely based on probability, but their observed behavior might be a giveaway. Some players will lean toward their gut, others will trust the numbers.
This sort of analysis can be used all the time to give you better bearings on the chances of your opponent having a key card that could wreck your plans.
Setting your tempo strategy for the game.
Gauging how aggressive you want to be in a given matchup is a hard call. Consulting the charts to see how “soon” you or your opponent are likely to draw a key card can help inform your strategy.
Blitz Rhinar with a Bloodrush Bellow combo (especially if played from arsenal) can often be a game-ender. If you’re going against Rhinar, you likely want to be as aggressive as possible as soon as possible, because it’s only a matter of time before he draws that card, pops off, and potentially OTKs you with a triple or quadruple Intimidate 18+ damage turn. So how much time are we likely to have?
Consulting the cumulative chart for Blitz (Chart 2B), we can see that the Turn 3 draw (4 cards drawn from a 32 card deck) gives us a 51.54% chance. And on Turn 4, it goes up to 64.62%. Knowing it’s likely that by Turn 4 Rhinar will see his first copy of Bloodrush, we can conclude that we really want to have applied significant life pressure by that point in the game in order to prevent him from keeping his whole hand for a big Bellow turn. Of course it’s possible that he can “high roll” you, winning the die roll to go first, draw a Bloodrush on Turn 0, arsenal it, and then proceed to OTK you on Turn 1. That’s variance in action. It’s not likely, though.
You will see key cards only slightly more quickly in Blitz than CC.
Using the same Rhinar example, we saw that the cumulative chance of drawing a Bloodrush Bellow by Turn 4 was 64.62%. In CC, the chance is 61.30%, a 3.32% decrease. This is not a completely negligible difference, but it’s also not critically significant. The true range, if you compare the charts in detail, will vary anywhere from as little as a 0.23% decrease in CC, (on Turn 1) to a 6.03% decrease (on Turn 7).
For this reason, as I’ve been working on internalizing these numbers, I’ve decided to focus primarily on the CC charts, and then simply add a few percentage points if I’m playing Blitz to get a relatively close estimate.
Chances of getting a “good” arsenal card on Turn 0.
As I covered in my previous Rathe Times article Should I Go First?, one of the primary reasons to go first is to get a valuable card tucked away in arsenal. We can use hypergeometric distribution to evaluate how likely this is. If you’re only hoping for one particular card, we know that the chance of getting 1 (or more) of a card on turn 1 is 19%. Not very likely. If this is the only reason you’re choosing to go first, you’re making an unlikely bet. However, most decks have more than one card that are a good fit for a Turn 0 arsenal. Count them up, then calculate. Let’s say you have 12 really good arsenal cards that you’d like to see on your Turn 0 draw. Plugging the numbers in, we can see that your chances are far better - an optimistic 60% of drawing 1 or more of those cards.
With someone like Iyslander, who is happy to see just about any blue from her deck on Turn 0 so she can unlock the ability to play on her opponent’s turn, you’re practically guaranteed to draw something useful to put in arsenal: a 97.82% chance with 36 blues in the deck, not an uncommon number of blues for CC Iyslander.
So, as you evaluate your deck and consider the pros and cons of going first, take a minute to do the math and see just how likely you’ll draw something you like.
Before the game starts, pick “key” cards in each matchup to focus on, particularly your opponents’, and pay attention throughout the game.
There are lots of things to pay attention to in a game of Flesh and Blood, and having all this data can be overwhelming. Sometimes the best thing to do is to keep it very simple. Before each game, consider a single key card that your opponent is likely to be playing and choose to pay attention throughout the whole game for that card. Pay attention when they pitch, making sure you don’t miss anything. You can always look in their graveyard as well. If you know how many copies of the card you’ve seen, and you can keep track of the turn number, with time and practice, you will be able to start estimating probability, even if the charts aren’t in front of you. But it will take practice.
Limitations
Finally, it’s worth acknowledging the limitations of this method during gameplay.
- Decks that shuffle frequently, such as Runeblade (thanks, Sonata Arcanix), will make it more difficult to calculate, but not impossible. If a key card was pitched earlier but then gets shuffled later, you’ll just have to perform the calculation as if the card is back in the “full” remaining deck.
- Decks that draw or banish lots of cards, such as Kano or Chane, will accelerate the math, making it more likely at an earlier point in the game that they draw a particular card that hasn’t already been revealed. Try to account for this mentally.
- Watch out for the arsenal. If the opponent is saving a card in arsenal for multiple turns, think carefully about what it could be given the matchup and factor that into your decisions.
In Part II - available to our subscribers as part of our Pro Series - we turn our focus to deckbuilding and how we can continue using this formula to set our decks and sideboards up for probability success.