While Lexi has claimed the spotlight in her bright fashion, Azalea has continued to hone her craft in the shadows. And in that development, one build has found success on a radically different path. Making its public debut at the Calling: Baltimore, Sandscour Azalea has finally given reason to re-evaluate what we've conventionally believed about what makes a successful Azalea deck.
A Fresh Perspective
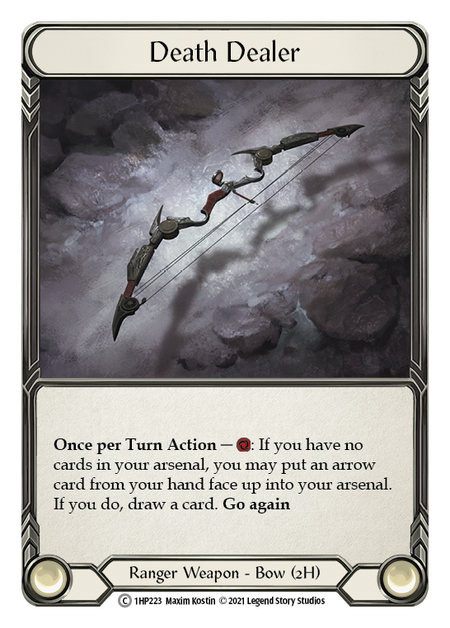
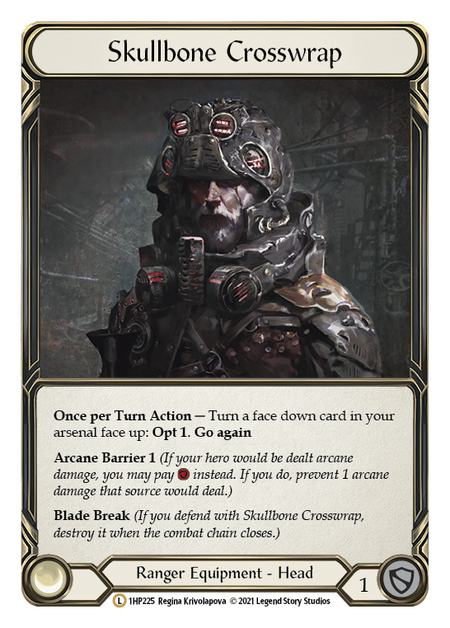
Above, you'll see what were generally considered to be the essential tools of the trade for Azalea. Skullbone Crosswrap allows Azalea to leverage an arsenal'ed card to filter her topdeck and better set up for dominate. Death Dealer can be used to pay for your entire turn while replacing that pitched card in hand. On-demand Opt and regular card draw have been considered among Azalea's strongest assets - and Sandscour builds are using neither.
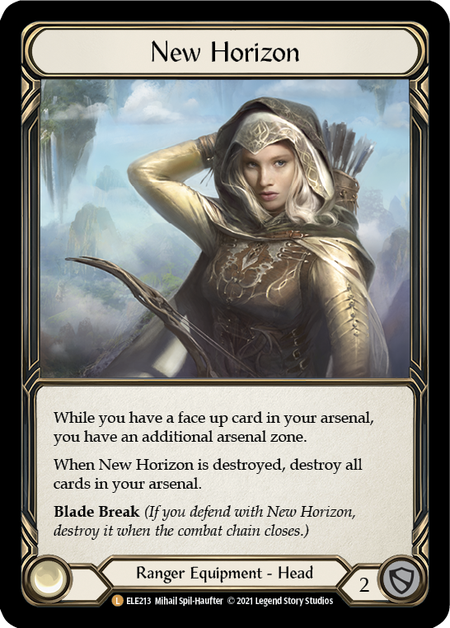
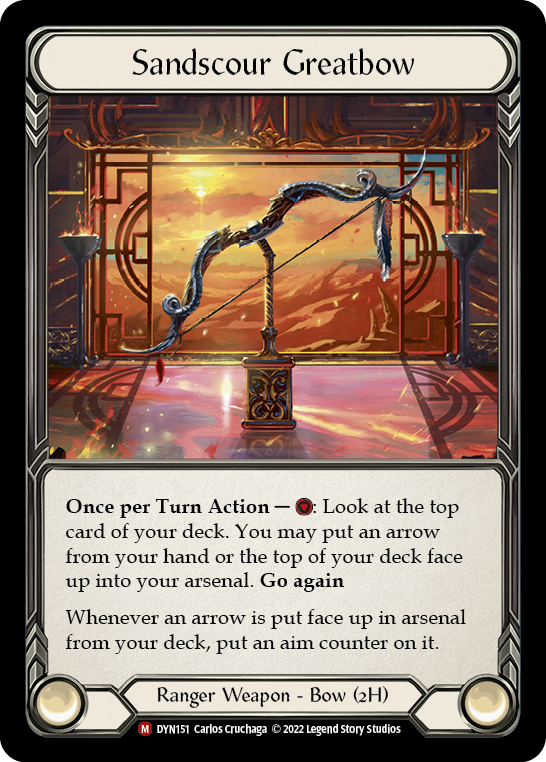
Lexi has shown how New Horizon can set up incredibly wide turns. But wide has never been Azalea's thing, leading to a general dismissal of the prospects offered by New Horizon. It took Sandscour Greatbow to change the narrative around the legendary headpiece, both by dropping the 'no card in arsenal' requirement to load it and by minimizing the penalty for a non-arrow finding its way into your arsenal. In fact, it's what we're hoping for.
Bows load arrows into arsenal. Which means for your typical Azalea to make any use of an extra arsenal slot, we need to find a way to get non-arrows into it - which Sandscour Greatbow can do, in conjunction with Azalea's hero ability. By activating Sandscour, we get a preview of our top card, and then the choice to load an arrow from hand or top of deck. In situations where the top card is a buff we'd like to play, loading an arrow from hand sets Azalea up to replace it with that top card.
Sandscour Lines of Play:
- Activate Sandscour, spy an arrow on top, load that arrow with an aim counter.
- Activate Sandscour, spy an arrow on top, load an arrow from hand, Azalea into the arrow from top of deck with an aim counter and dominate.
- Activate Sandscour, spy a non-arrow on top, load an arrow from hand, Azalea into the non-arrow from top of deck.
Things get even more spicy when we start our turn with a card in arsenal. It's face down, because it's simply an end-of-turn arsenal-ing and thus New Horizon isn't giving us a 2nd arsenal zone. Historically, a face-down arsenal at start of turn has been ideal: Skullbone Crosswrap would turn that face up and we'd gain info on the top of our deck. In a New Horizon build, however, we're likely to do the infamous 'blind Azalea' - in fact, it's our bread-and-butter!
At the start of the turn, you convert that card into a fresh card in arsenal, which is now face up, and open up the arsenal for another card. Furthermore, with the Sandscour lines available to us, you've just created the opportunity for a 6-card hand: activate Sandscour (with a Tunic resource, for absolute peak efficiency) and load an arrow from topdeck.
These are play patterns entirely unique to Azalea, and more specifically, Sandscour builds. Lexi (the most closely comparable alternative) can load and fire multiple arrows in a turn, but the wrong combination of buffs and arrows can spell disaster; and she has few options available to correct a bad card in arsenal. Azalea also has some similarities to Bravo in that both force disabling on-hit effects with dominate; but the higher costs for his attacks mean he's pitching many of his cards, while Azalea's playing them and getting their effects.
Six-card hands sound fantastic, but let's be realistic: you've got to defend too. And that's where Sandscour builds have more flexibility than Azalea historically has. Because we can load an arrow from the top of the deck, we can go down to 1 in hand and still play out a turn. (We even have a 'high risk, high reward' option akin to the classic 'blind Azalea' maneuver where we load from the top of the deck with Sandscour, then cycle that card with our hero power to hopefully load a second arrow, picking up both Aim and dominate.)
The Decklist
Weapons
- Dreadbore (1)
- Sandscour Greatbow (1)
Equipment
- Perch Grapplers (1)
- Hornet's Sting (1)
- Nullrune Gloves (1)
- Fyendal's Spring Tunic (1)
- New Horizon (1)
- Nullrune Boots (1)
- Quiver of Rustling Leaves (1)
- Crow's Nest (1)
Loadout
- Battering Bolt (Red) (3)
- Drill Shot (Red) (1)
- Codex of Frailty (Yellow) (3)
- Infecting Shot (Blue) (3)
- Lace with Bloodrot (Red) (3)
- Barbed Undertow (Red) (3)
- Fletch a Red Tail (Red) (3)
- Drill Shot (Blue) (1)
- Lace with Inertia (Red) (3)
- Spire Sniping (Yellow) (3)
- Dead Eye (Yellow) (3)
- Memorial Ground (Yellow) (3)
- Murkmire Grapnel (Red) (2)
- Eye of Ophidia (Blue) (1)
- Immobilizing Shot (Red) (2)
- Heat Seeker (Red) (3)
- Nock the Deathwhistle (Blue) (3)
- Remorseless (Red) (3)
- Premeditate (Red) (3)
- Read the Glide Path (Yellow) (2)
- Red in the Ledger (Red) (3)
- Release the Tension (Red) (3)
- Remembrance (Yellow) (1)
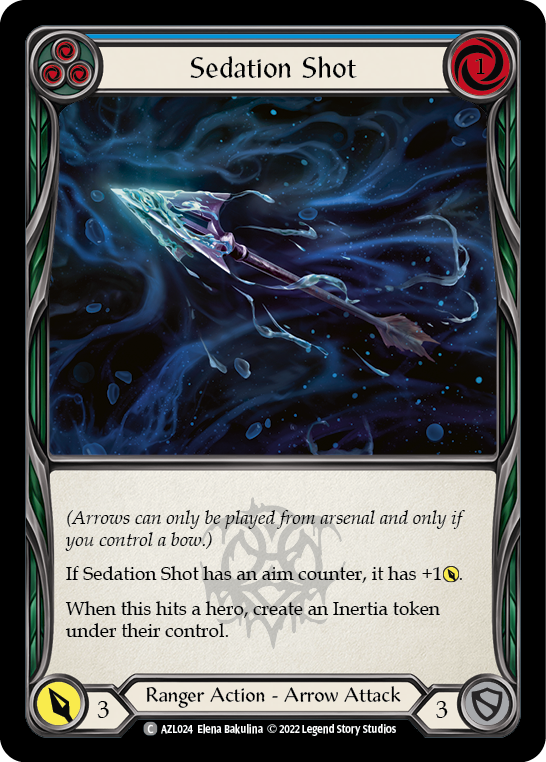
- Sedation Shot (Blue) (1)
- Seek and Destroy (Red) (3)
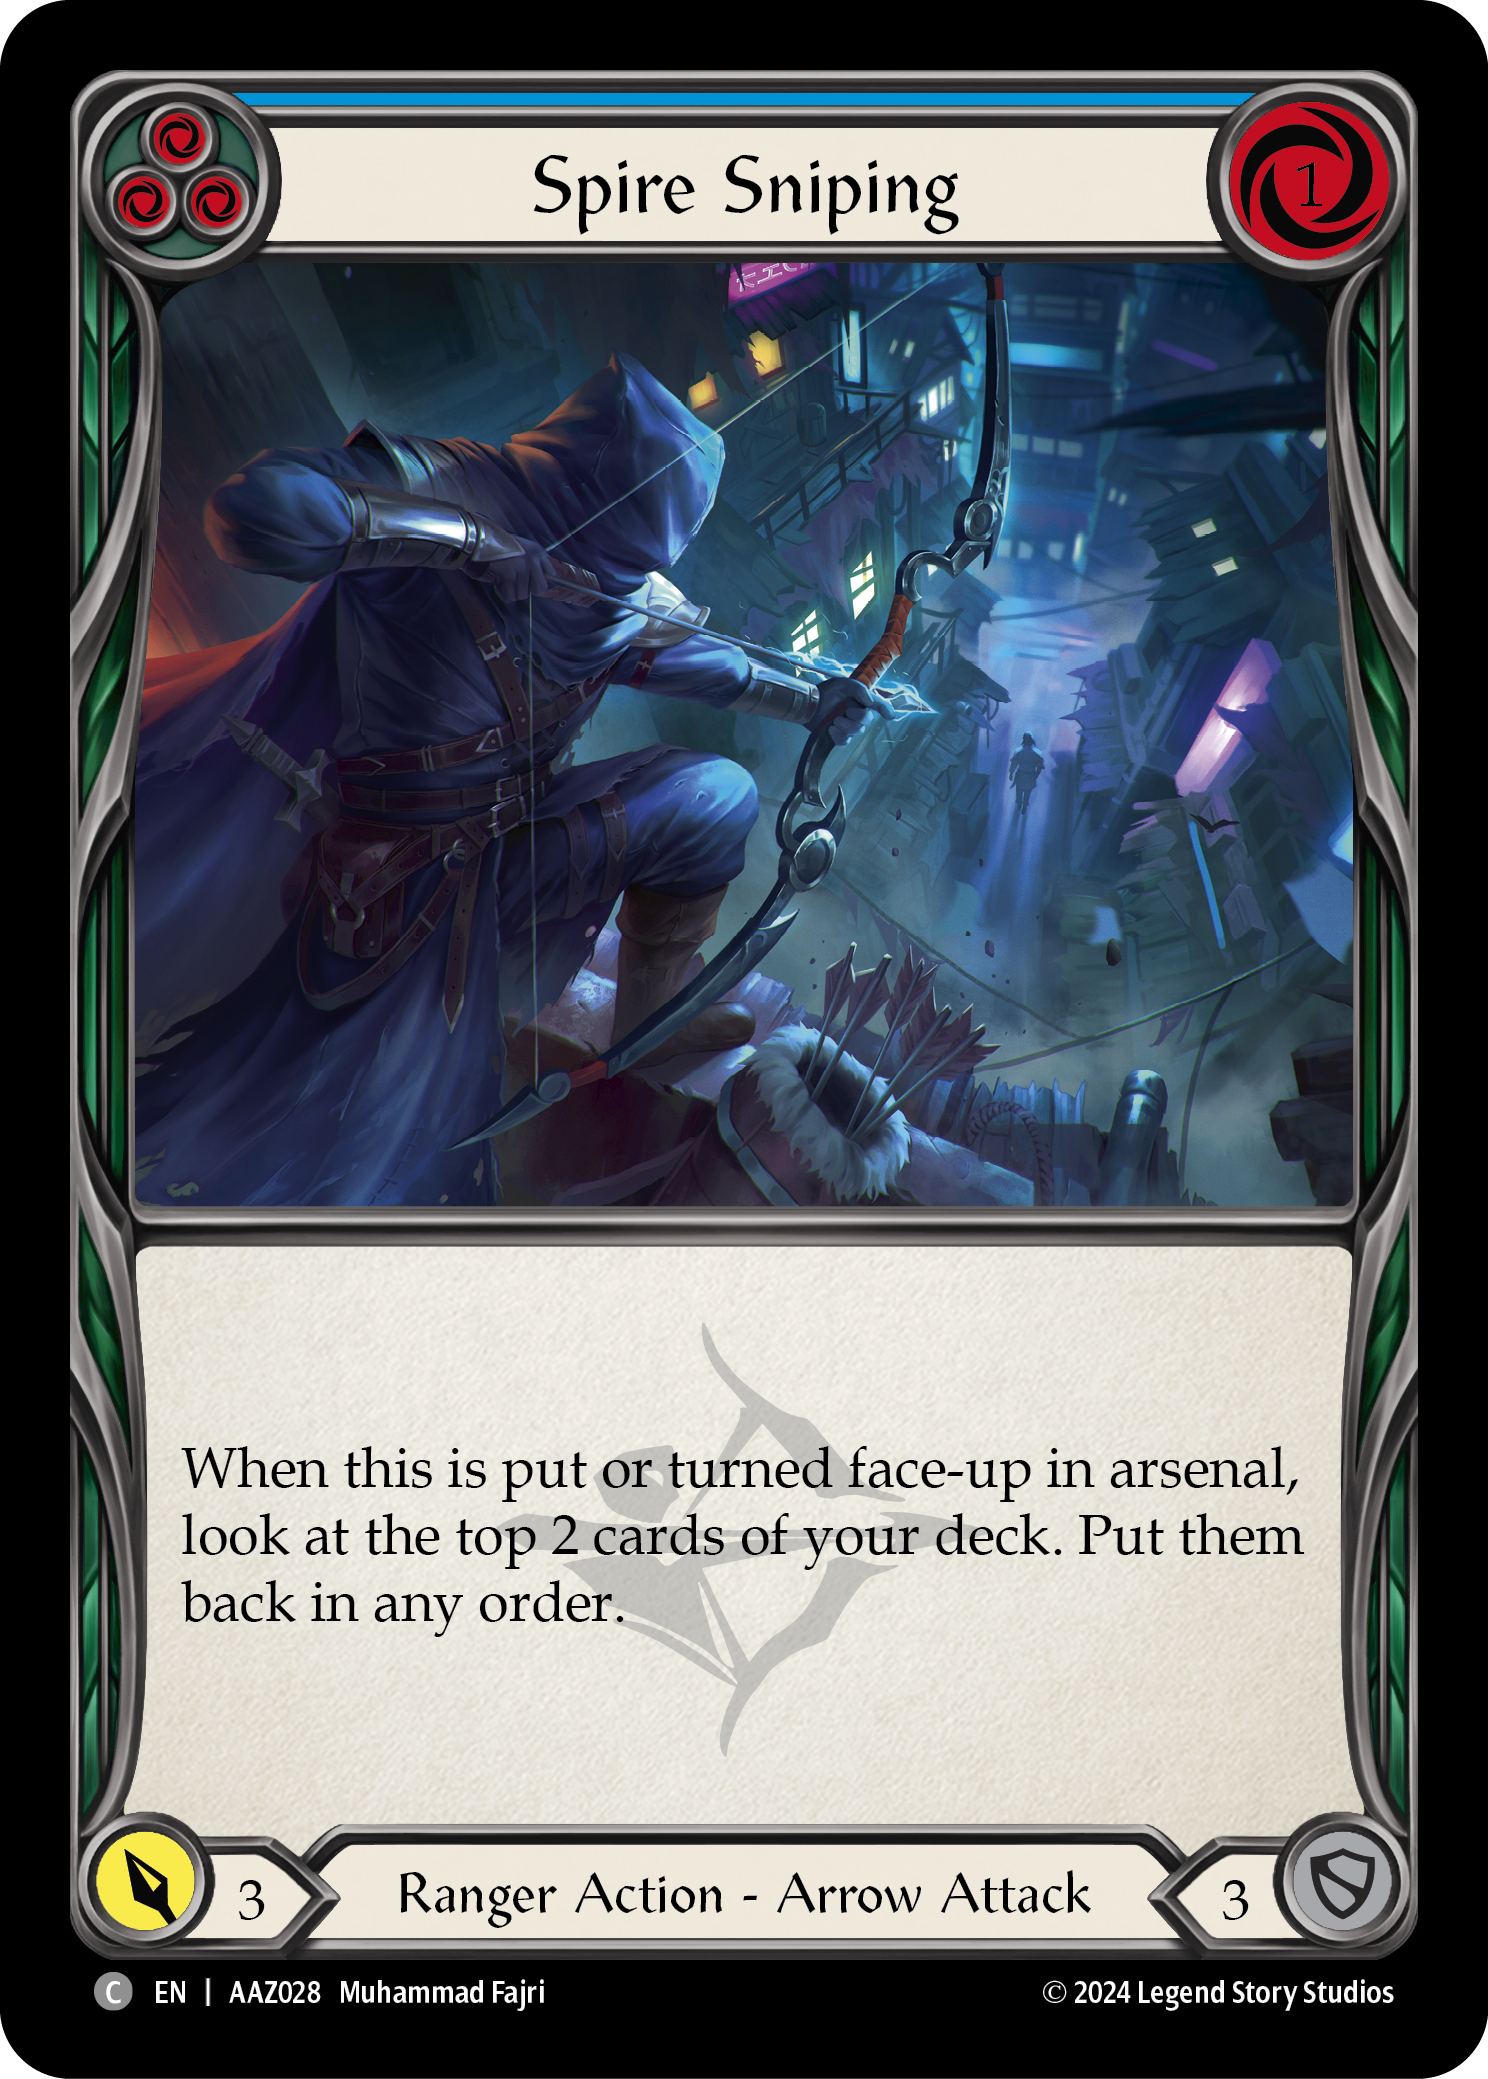
- Spire Sniping (Blue) (3)
- Ravenous Rabble (Red) (3)
The Sandscour Greatbow list we're showcasing today was developed by the Card Advantage team and made the Top 8 at the Calling: Baltimore. They've created a number of videos about the deck (you'll find the first one embedded at the end of this piece), which go a long way in helping to explain card choices and teaching the tactics necessary for succeeding with this list.
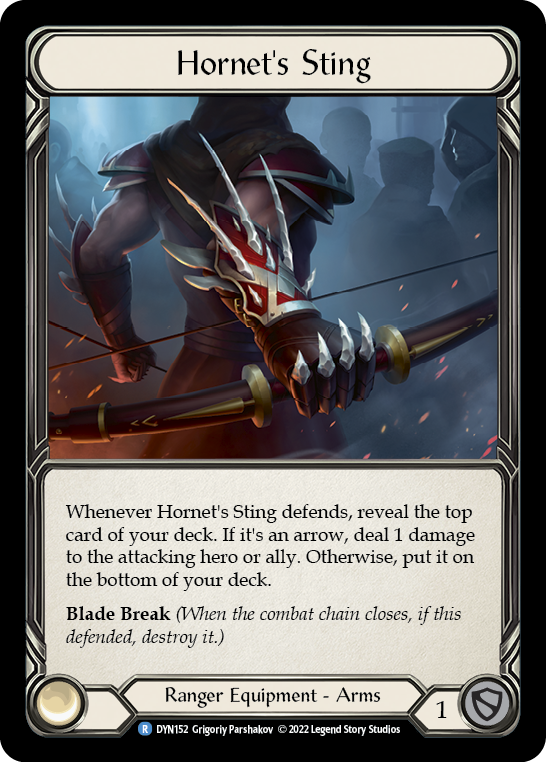
Beyond the already-discussed New Horizon and Sandscour Greatbow, our standard equipment loadout consists of Fyendal's Spring Tunic, Perch Grapplers, Hornet's Sting, and Quiver of Rustling Leaves. The Tunic needs no explanation, but Perch Grapplers and Hornet's Sting were both chosen primarily for their defense values - and the sting from Hornet's is nice for destroying a dragon mid-attack while giving you insight into your topdeck.
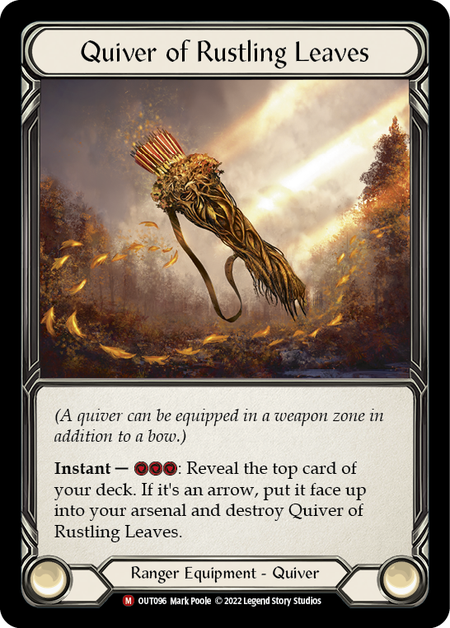
At a glance, Rustling Leaves may feel like a strange choice in quivers; but Crow's Nest is redundant when we're using the Greatbow, and Abyssal Depths is limited to retrieving arrows (when what we usually need to close out a game is more buffs). Rustling Leaves is an excellent tool for getting an extra card into arsenal on turn 0, which is most often how you'll want to use it.
The Arrows
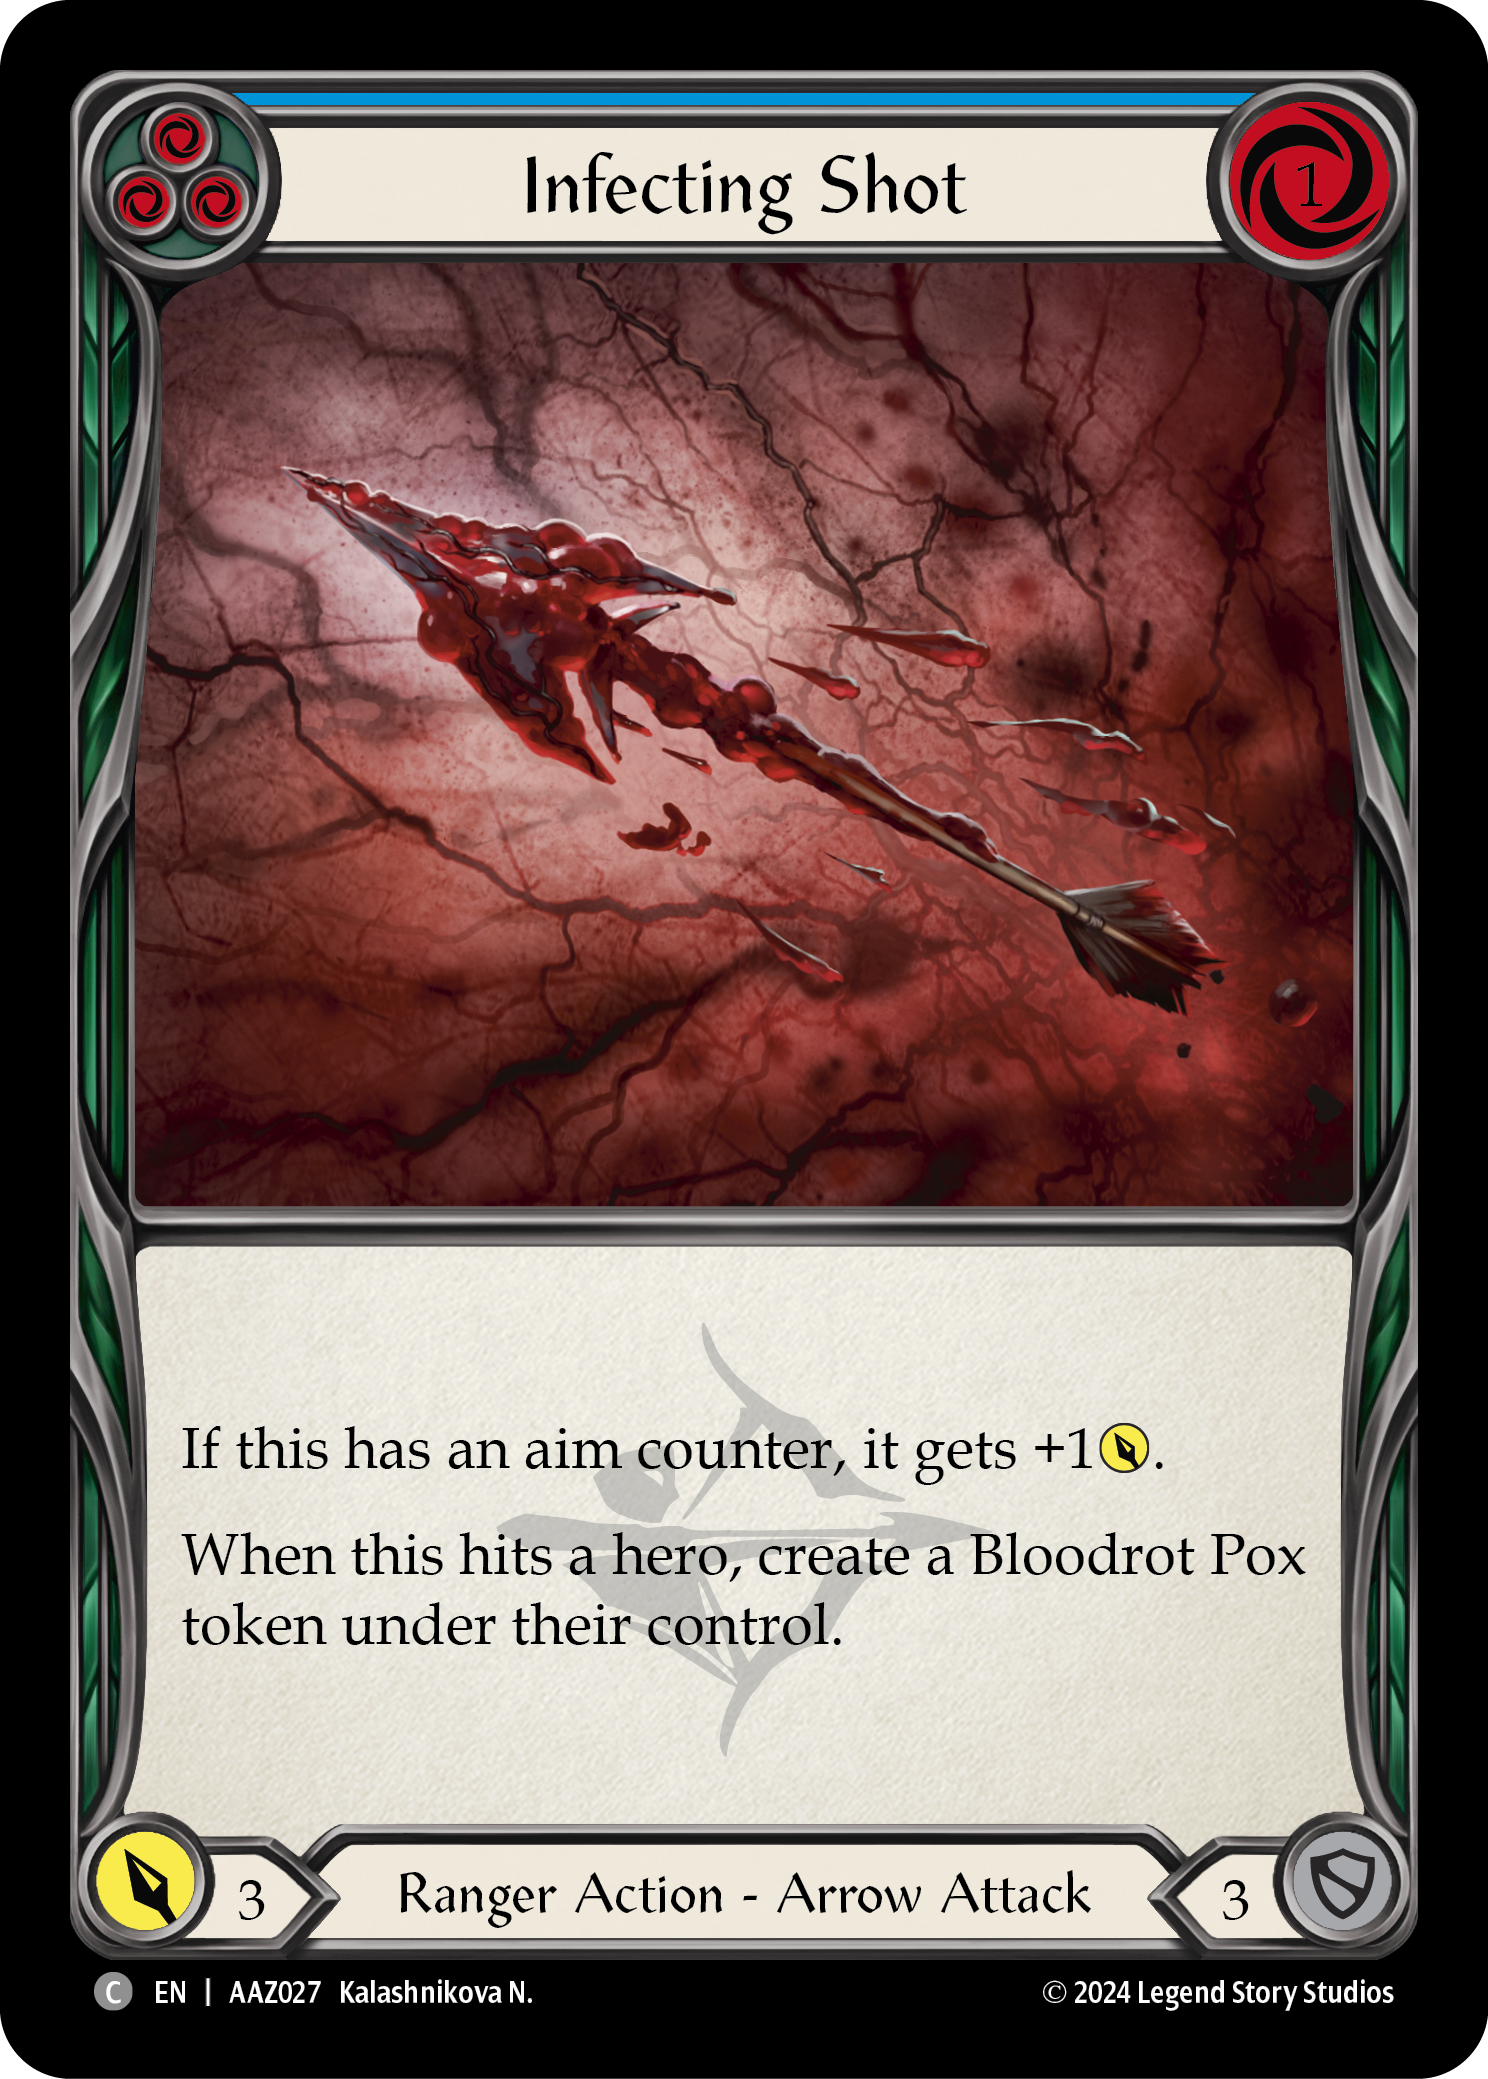
The focus of this list is to be as disruptive as possible, using our on-hit effects as proactive defenses so we're free to make decisions based on our best attack lines and not theirs. At every turn, disruption has been prioritized over numbers - which is why all-star arrows like Infecting Shot (R) are absent.
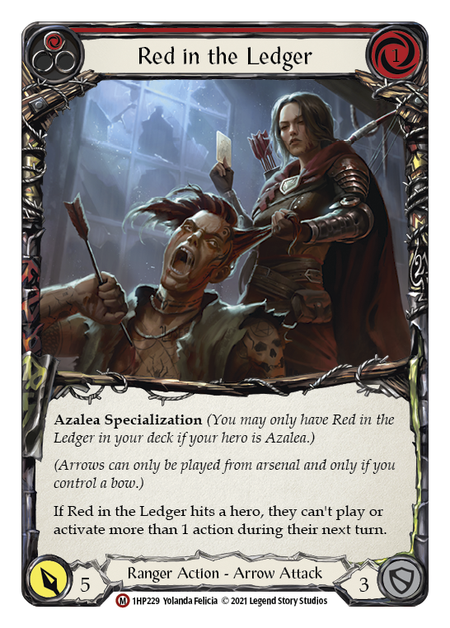
Red in the Ledger and Remorseless act as our key attacks, as you'd expect. RitL remains one of the most potent specializations in the game, and this deck is incredibly effective at both dominating it and recurring it. (We'll talk more about searching out and retrieving arrows later.) Locking your opponent into a single action, regardless of action points, effects nearly every hero, and puts us firmly in the driver's seat.
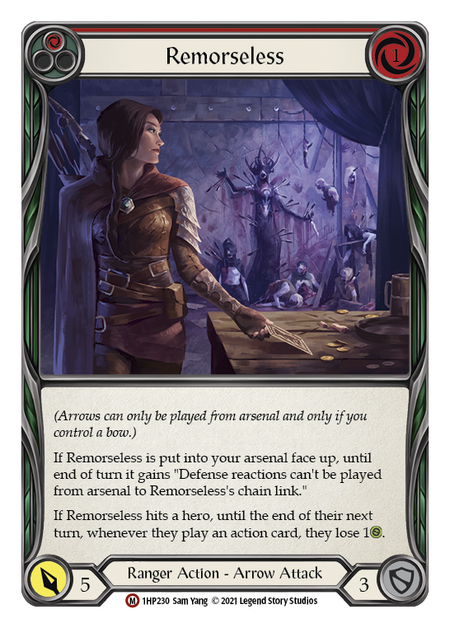
Remorseless, meanwhile, generates a solid bleed effect that makes this arrow deceptively damaging. It's also resistant to defense reactions - so even against heroes who won't play many actions, it still has a role to play.
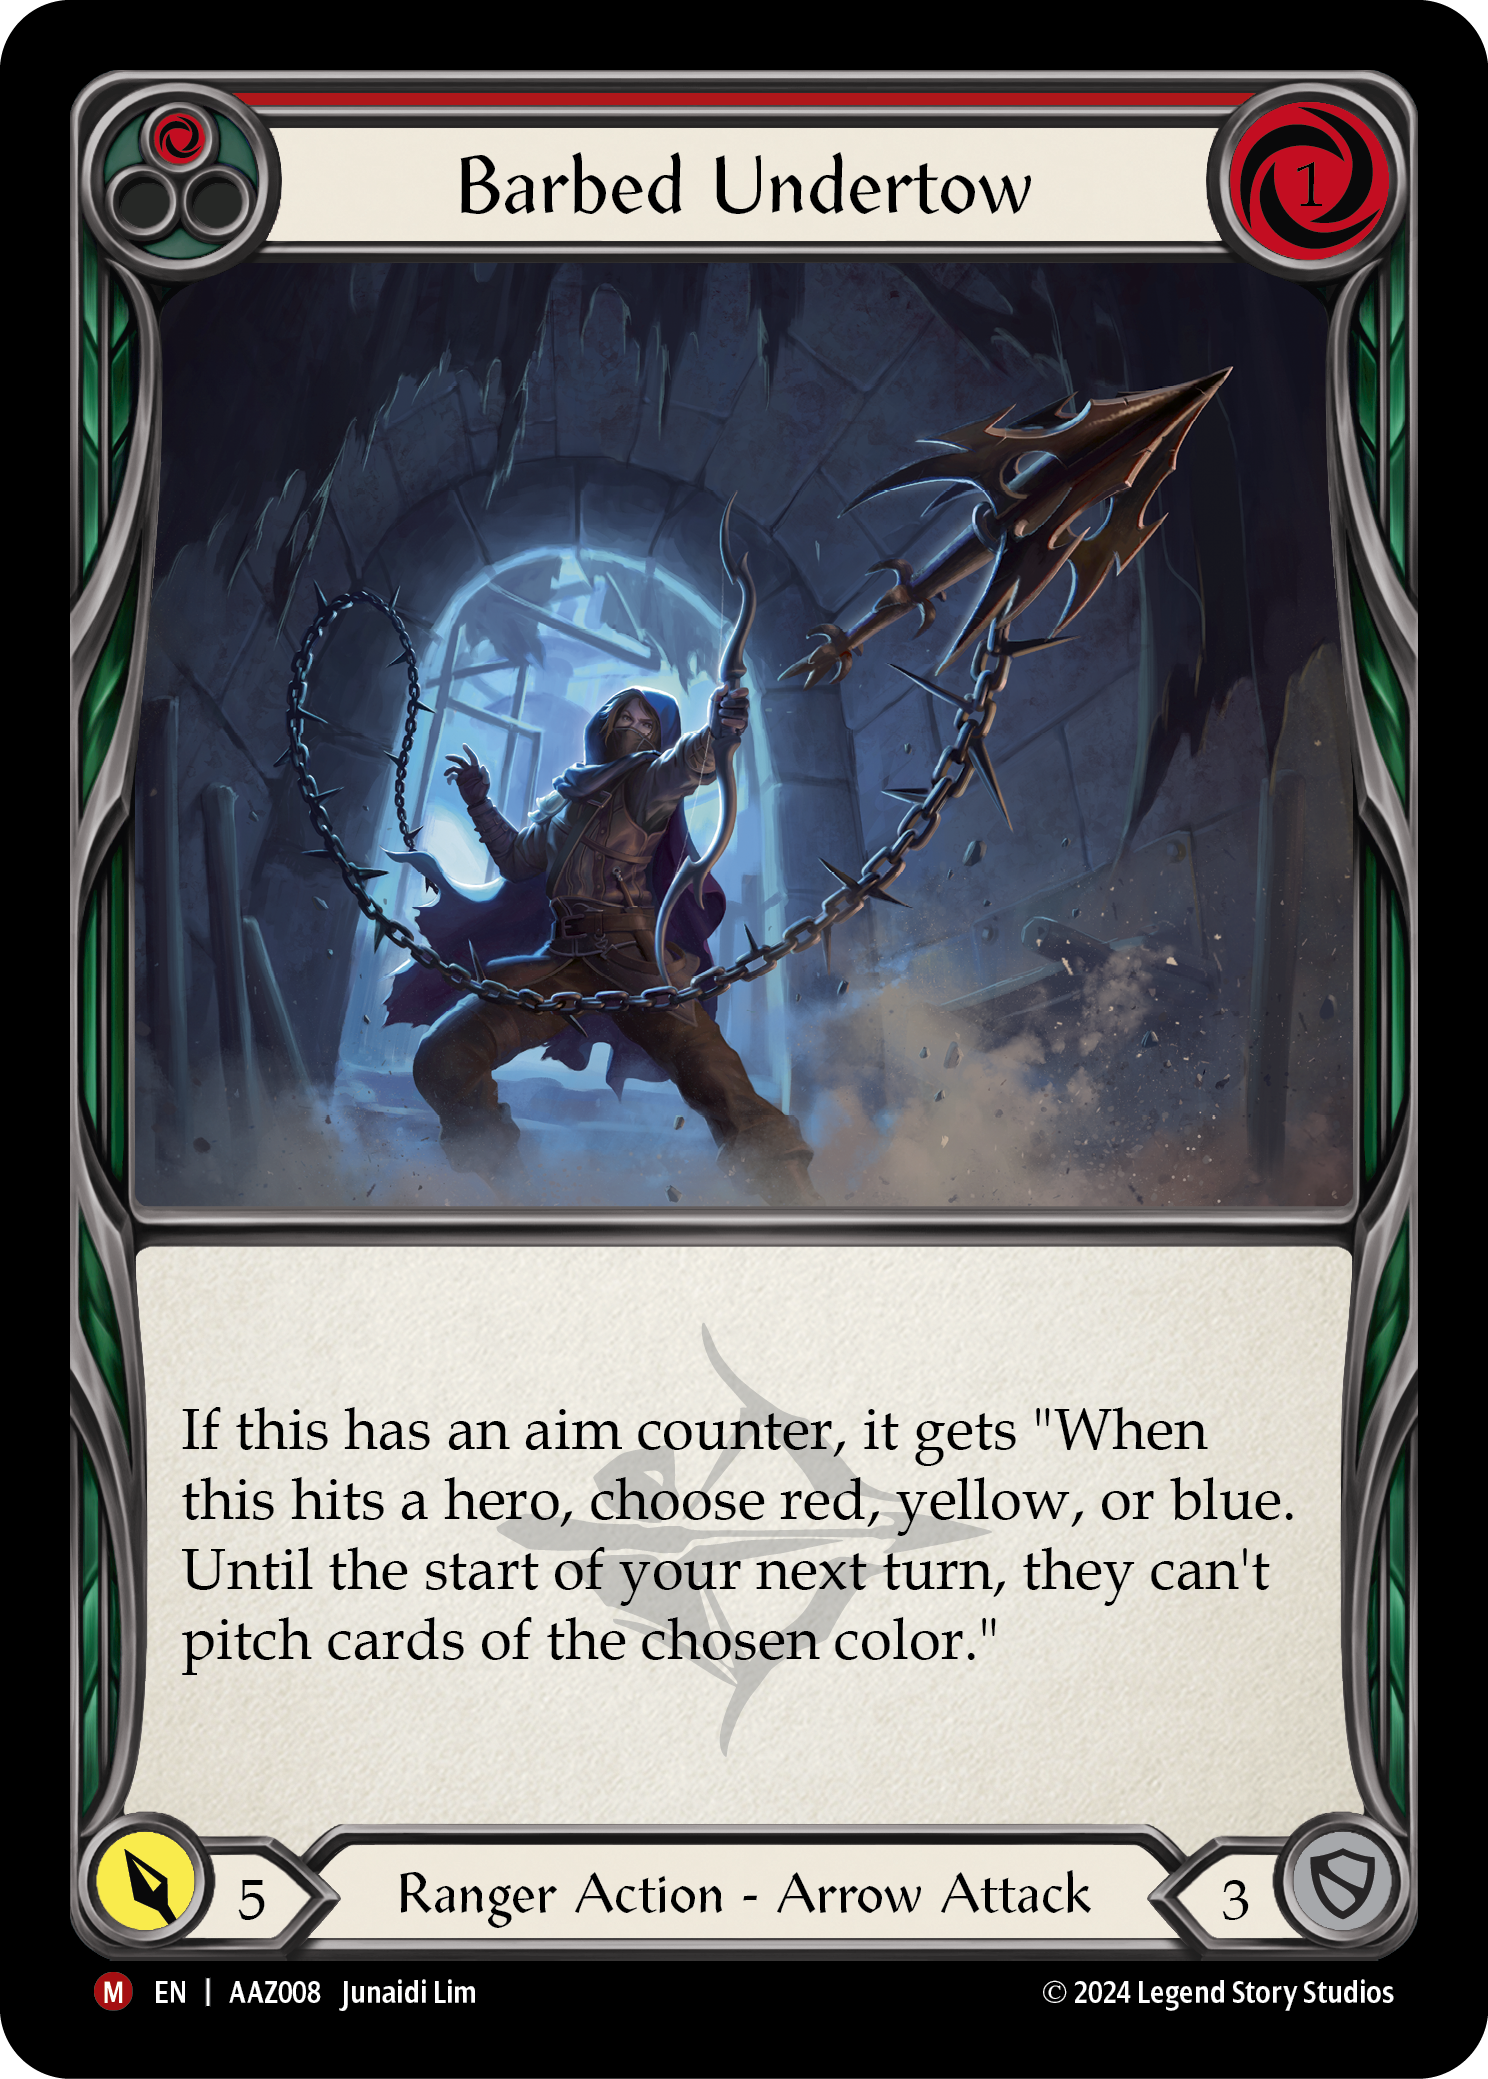
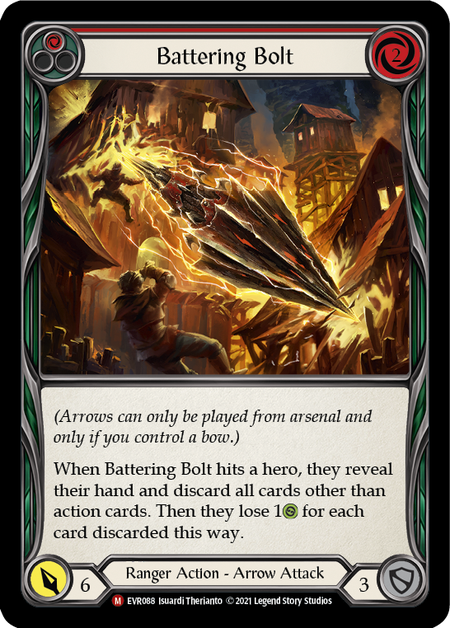
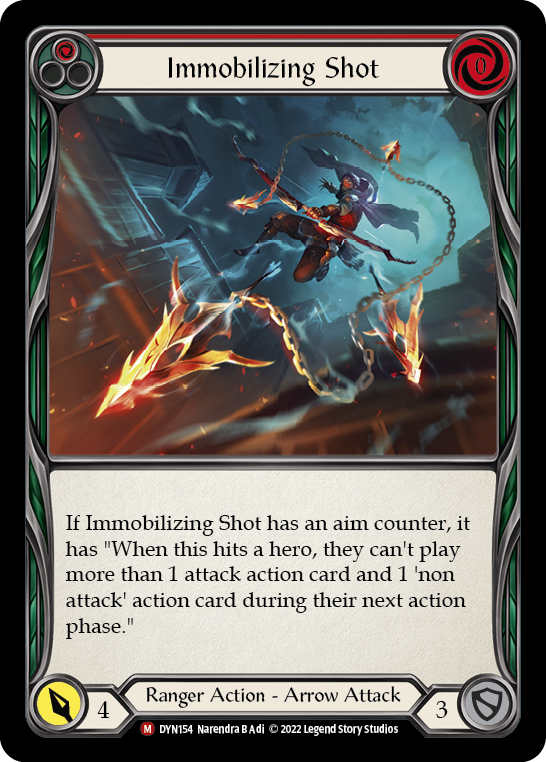
Alongside these two, any arrow from the sideboard becomes a key arrow in the matchup it's meant for. Battering Bolt pries reactions out of the hands of Warriors and Assassins alike; Barbed Undertow can ruin a Guardian or Draconic hero's ability to pay for things; and Immobilizing Shot further reinforces the theme of action reduction.
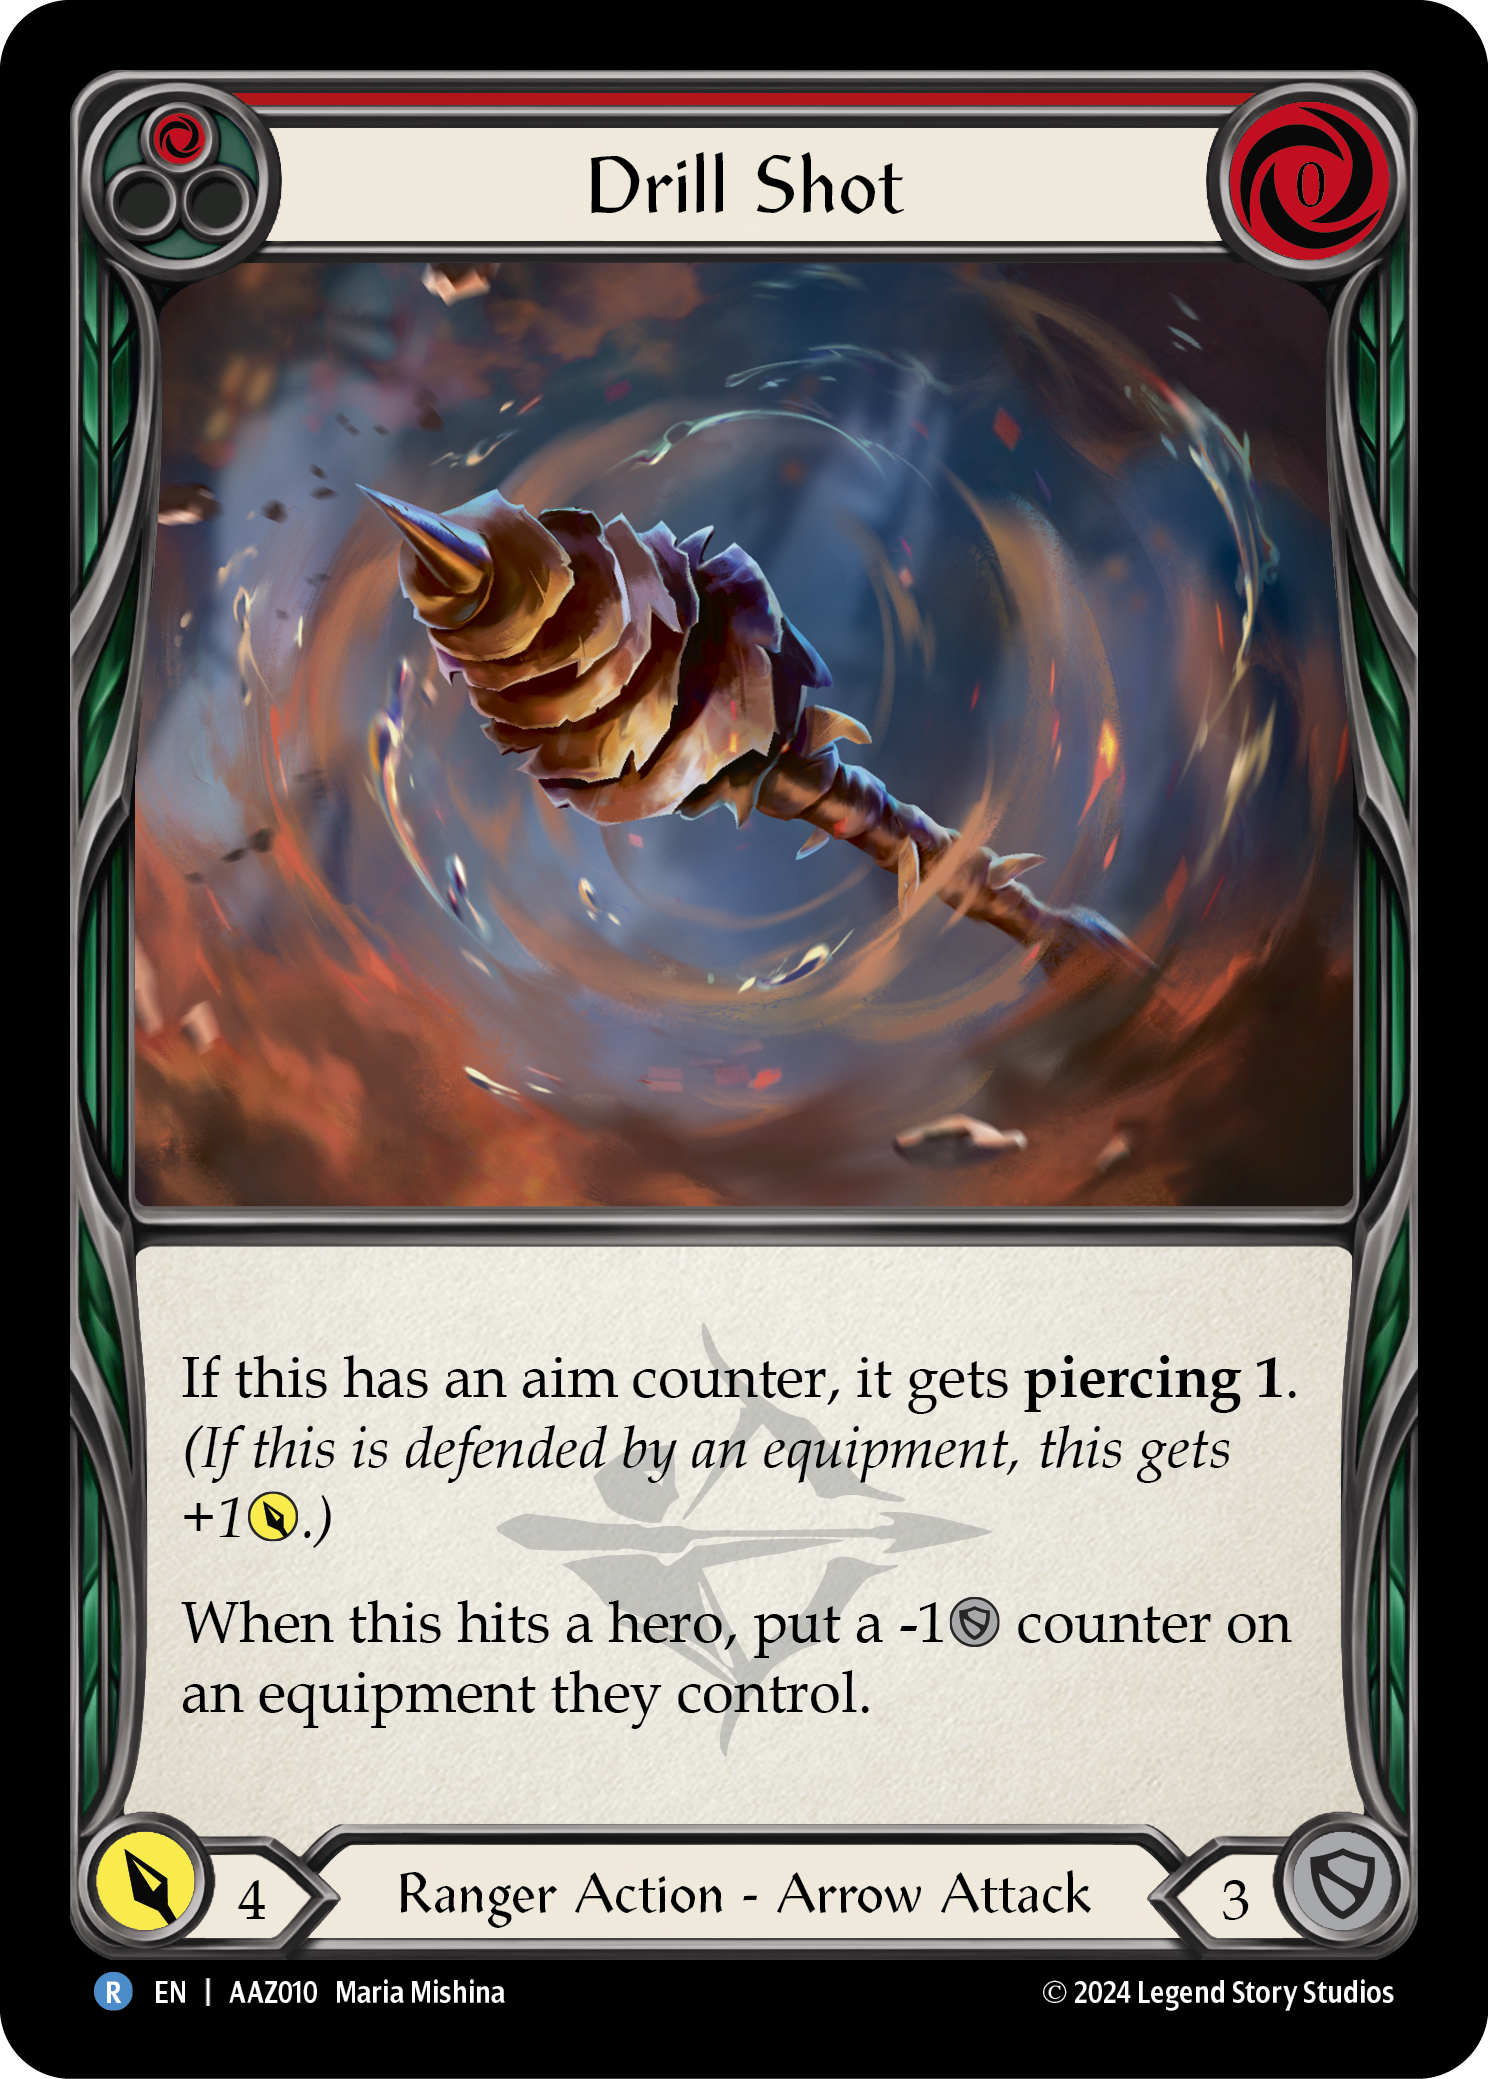
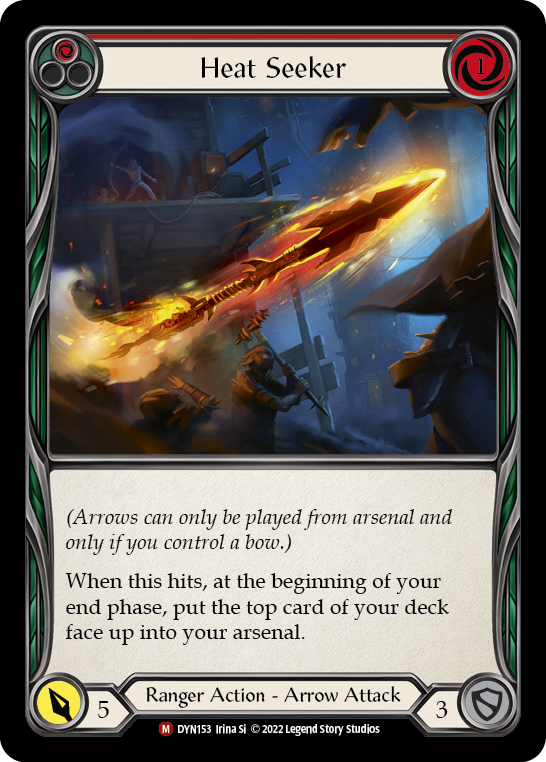
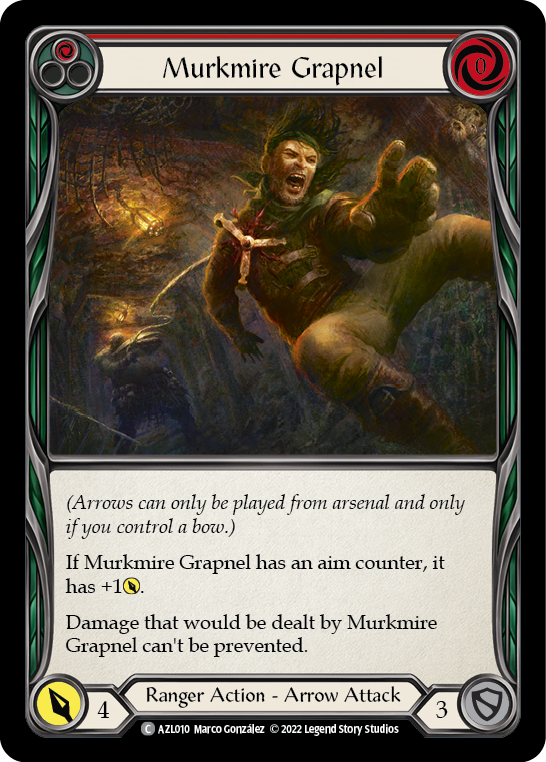
Then there are the role players. Murkmire Grapnel and Drill Shot both serve specific purposes into matchups where damage prevention and equipment blocks are problematic, but otherwise serve as 'generally fine' arrows. Heat Seeker, meanwhile, is an archer's Snatch, giving us an extra card in our arsenal (and since it came off the top of the deck, an arrow would pick up an Aim counter). While it doesn't directly further our disruption plan, its role setting up our next turn makes it one of our favorite cards to see.
For the most part, our blue arrows are decent effects that also carry arrow synergy, but are intended for pitching. Infecting Shot and Sedation Shot both reach the 4 breakpoint when they have aim counters; and Bolt'n' Shot truly unlocks when you manage to play a buff out ahead of it.
As you can tell from the pitch choices, Spire Sniping isn't intended for attacking. Its arrow tag merely helps us slip it into arsenal effortlessly, where it can scout our topdeck and set up Azalea. While it can't remove an unwanted card the way opt can, the deck isn't constructed to need that; usually, choosing between 2 cards will be entirely sufficient.
The Buffs
Pairing buffs with dominate is a tried and true strategy, as we can ensure our attacks are large enough to overcome even the most stalwart defenses and apply their on-hit effects. With our attacks focused on disruption, our damage needs to come from buffs. Because of that, our non-attack actions are our most precious cards.
For the most part, non-attack actions in this deck block for 2, which disincentives you from tossing them out on the defensive anyway. If given the choice between going into your turn without any buffs or without any arrows, the latter is most often the better choice; Sandscour can pull an arrow out of thin air, and even if we don't manage to attack, a buff in the arsenal is a great way to start the following turn. (We're also packing six cards that pull arrows out of the graveyard, so we don't mind if they wind up there.)
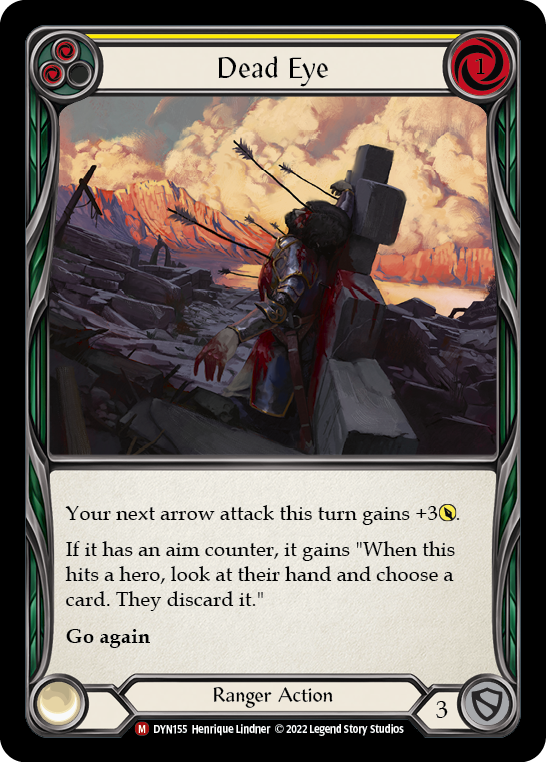
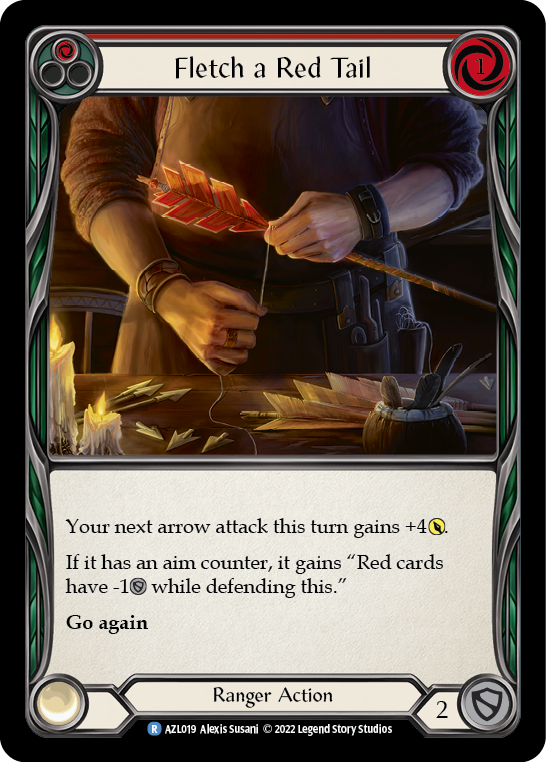
There are two buffs in the deck we're willing to pay for. Fletch a Red Tail is a +4, making it our biggest buff; and with Sandscour, the aim bonus is trivially easy to qualify for, making the effective buff even larger. Feel free to skip dominate when you play this card out. Dead Eye is one of the strongest payoffs for aim strategies, as it gives you full information about your opponent's next turn and gets rid of their most valuable card. A dominated arrow under Dead Eye's influence is incredibly terrifying.
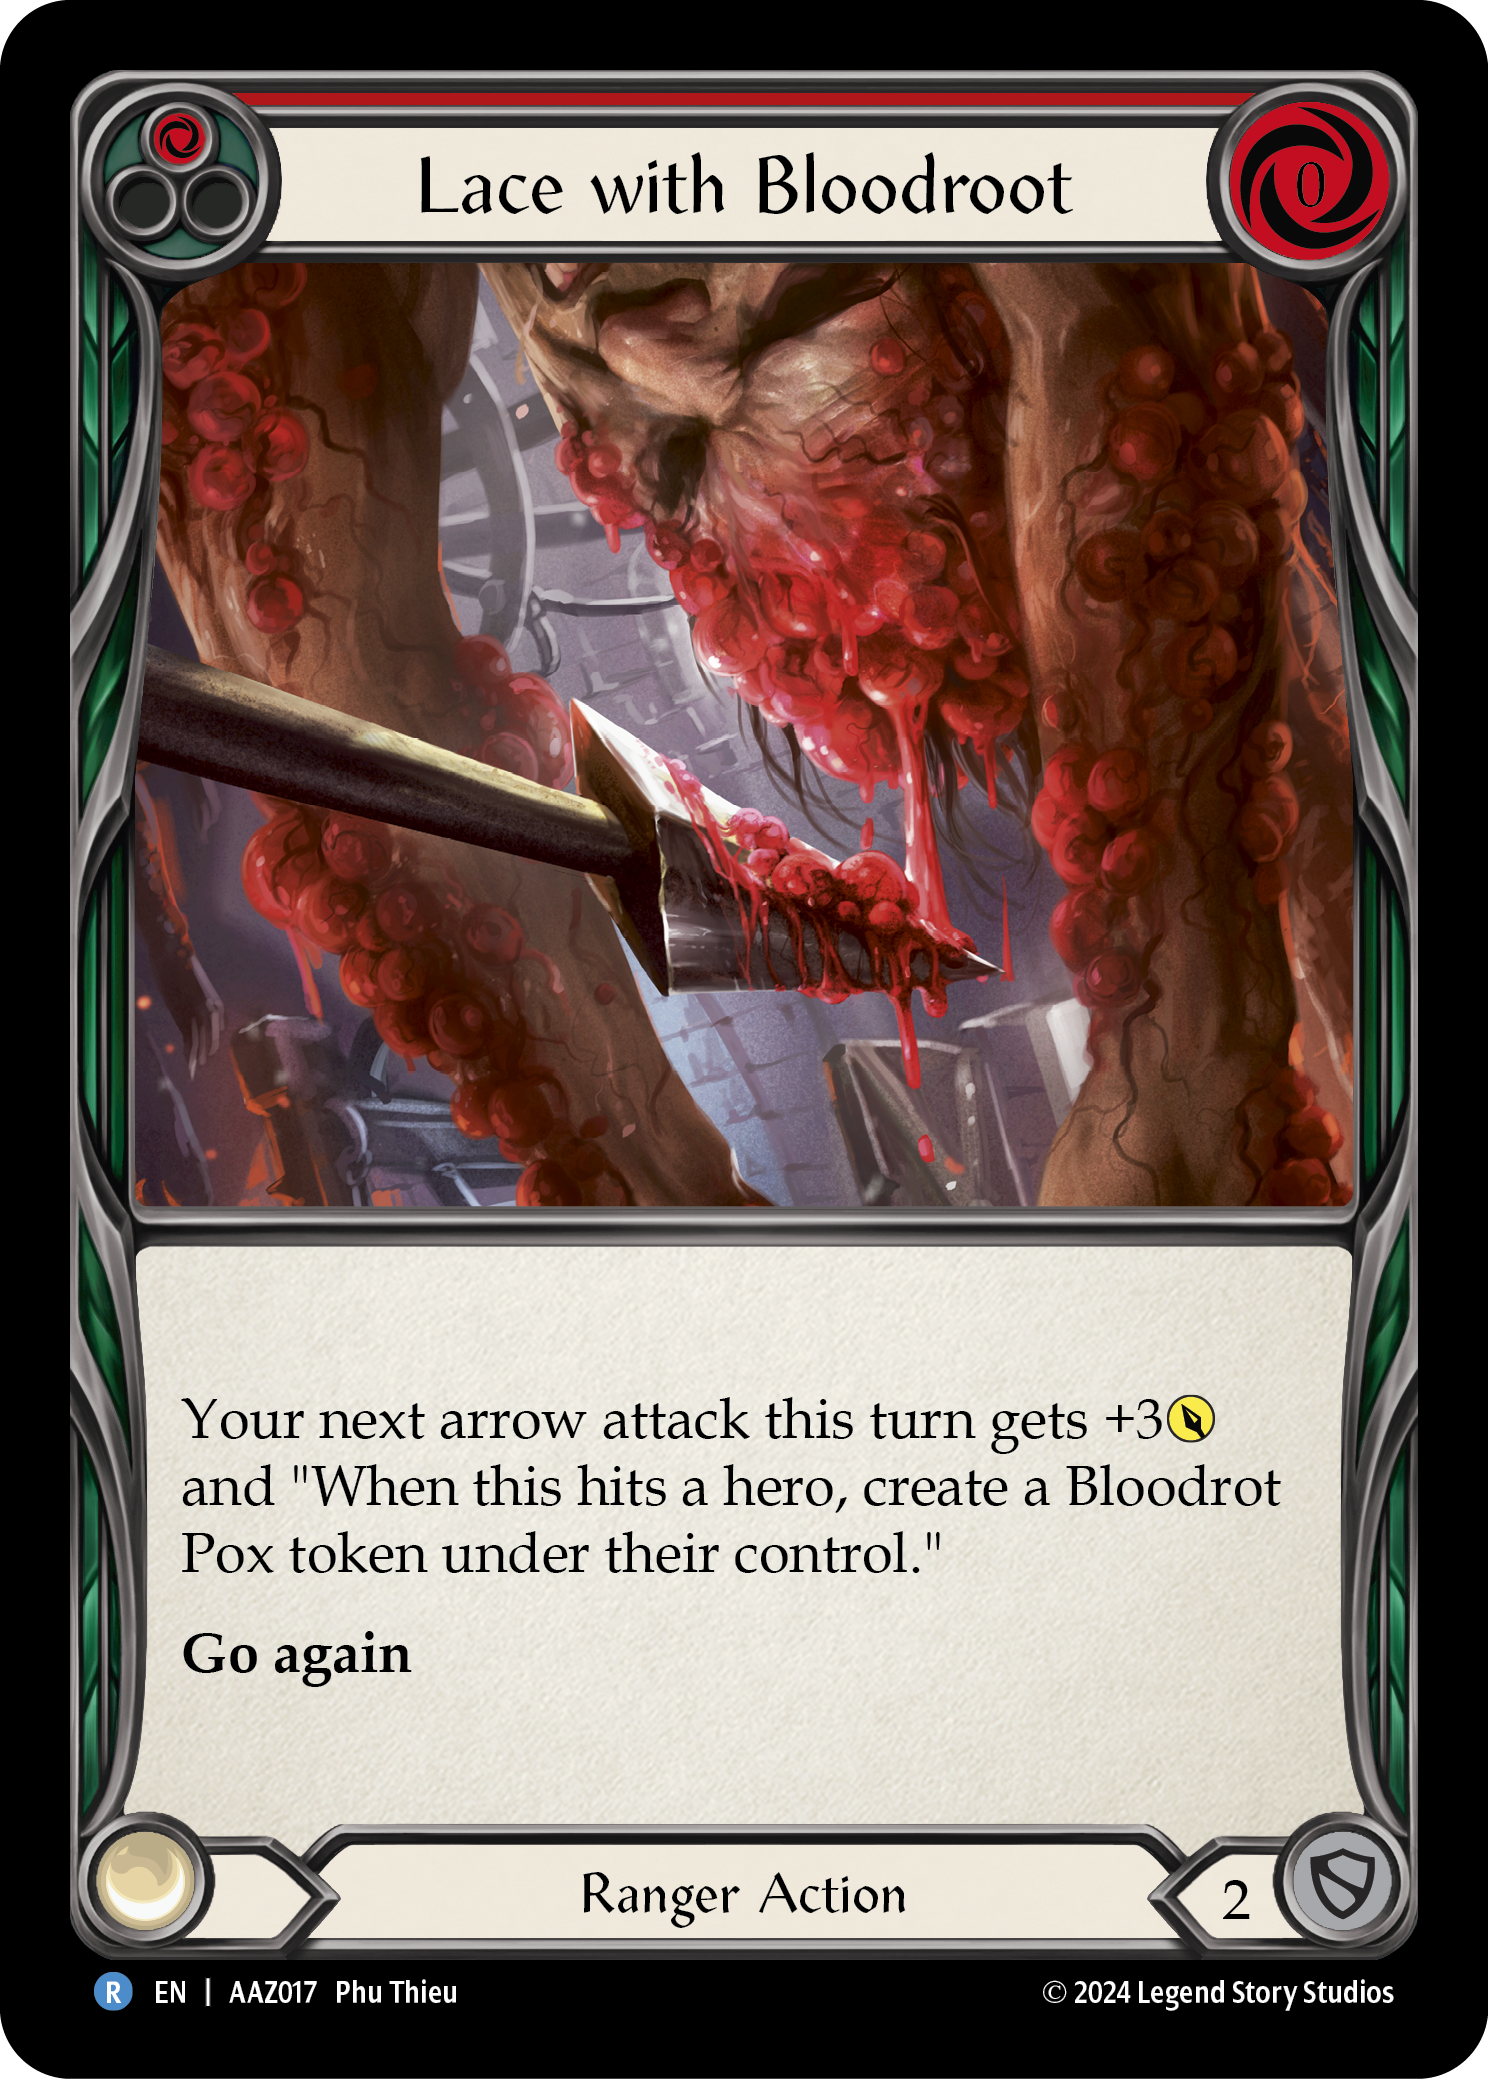
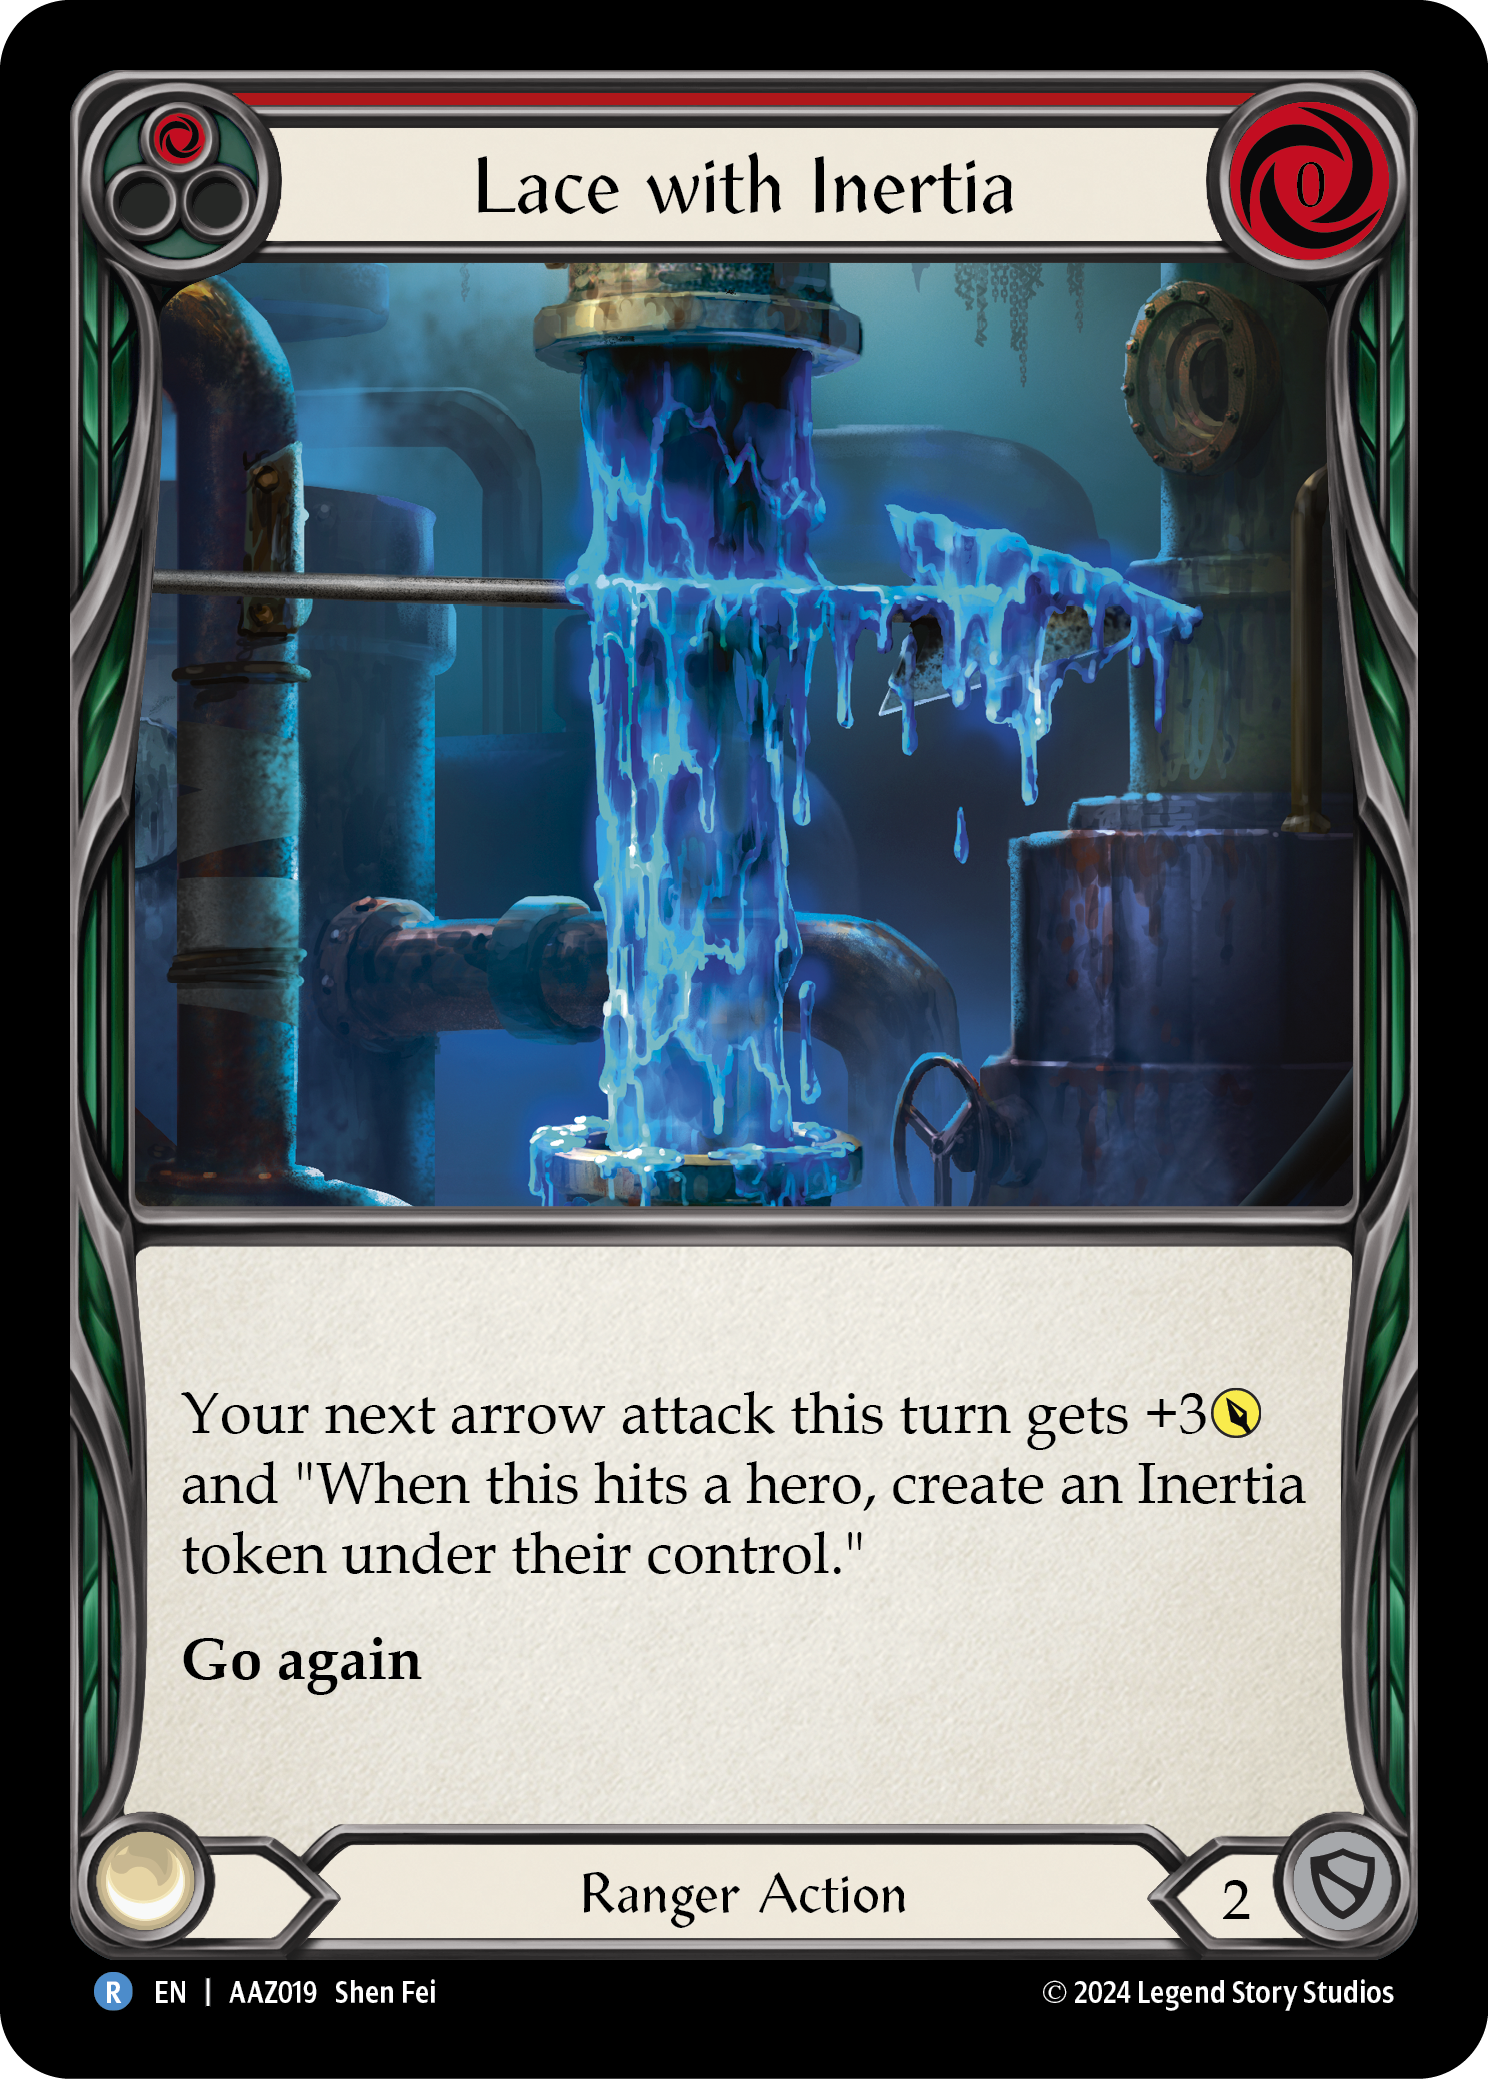
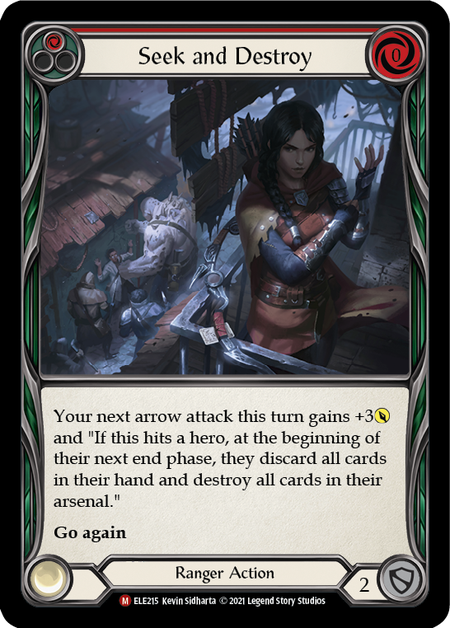
There's not much to say about the Lace buffs. They're 0-cost +3s, and they pass out disease tokens. Likewise, Seek and Destroy is relatively straightforward in application: it stops an opponent from keeping an arsenal. Along with Inertia tokens, these effects help build momentum and put you in a position of advantage turn after turn.
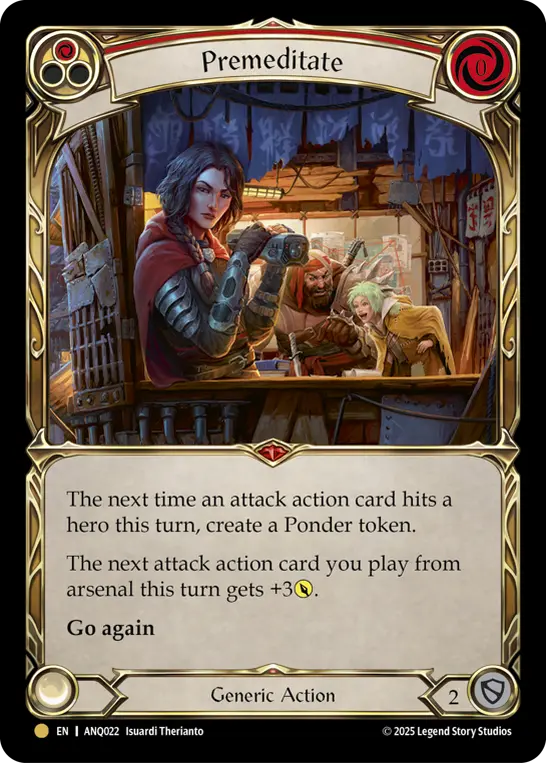
Codex of Frailty and Premeditate were two of the hottest cards coming out of Outsiders, and for good reason. Ponder tokens are essentially free arsenal cards for this deck, and set us up for those 6-card hands we're looking to attack with. Codex is also one of our six sources of arrow retrieval. The other - Memorial Ground - is arguably a stronger source of an arrow attack, as putting that arrow on top of deck means we can stick dominate to it. These two cards mean we can potentially fire Red in the Ledger 9 times in a game, or overcome prevention by calling up Murkmire Grapnel repeatedly.


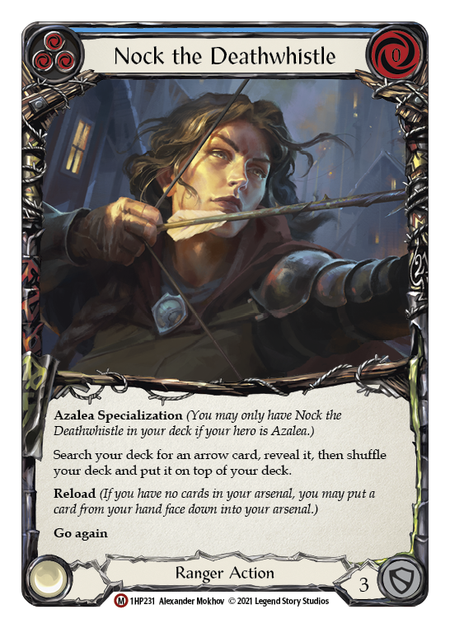
Of course, sometimes the trick is finding that arrow the first time. For this, Nock the Deathwhistle serves as an excellent solution. Nock essentially acts as 3 more copies of the best card in any matchup; and once that arrow's landed in the graveyard, you have more frequent access to it. If you don't need it, Nock still blocks for 3 and pitches blue.
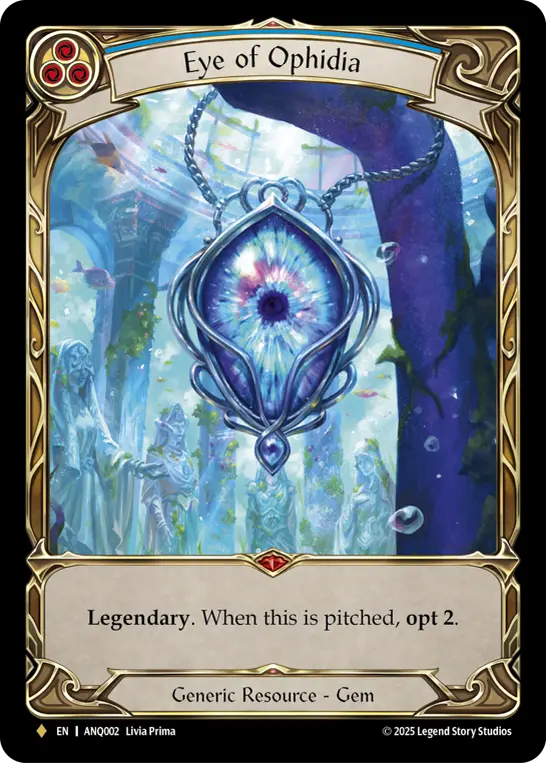
As long as we're talking about blues, let's touch on the elephant in the room: Eye of Ophidia. You've probably picked up on the fact that we benefit from control of our topdeck to a degree that only Kano could relate to. We're also exceptionally good at clearing out an oops in the arsenal. As such, Eye of Ophidia only stands to benefit us. Indeed, knowing your top 2 cards is one of the best things that this deck can do, as you can Sandscour an arrow from the top of the deck and then Azalea into the arrow beneath it for an aimed and dominated attack.
That said, Eye of Ophidia is simply a power spike turn in a deck that's already doing great things, and as such is entirely replaceable in most settings. If you're not playing at the Calling, you shouldn't feel bad if you're missing this card - or simply don't feel comfortable shuffling a $400 card! Personally, I've replaced it with the much more affordable Plague Hive, while many have opted for a different blue such as Fletch a Blue Tail. You can view this as your 'spice slot'; look for something that will create a unique opportunity for you.
Core Strategy
If you're new to Azalea, this deck represents a lot of learning. Even if you're a longtime Azalea player, switching from the play patterns of Death Dealer to Sandscour is a big adjustment. As such, I don't want to get too deep into the reeds on strategy. When you're ready for that, go watch the videos from Card Advantage.
To begin with, I recommend you focus on a few core playlines.
- The 6-card hand.
- Buff + arrow with dominate.
- Defend and set up.
The 6-card hand is most easily achieved with a Tunic resource. End your turn by putting a card into arsenal. If you draw into a hand that you can fully utilize - such as several buffs with a Spire Sniping or a Bolt'n' Shot - then open your turn with a Sandscour activation from your Tunic resource. Ideally, your top card is an arrow - and if it is, you can load that up for a full 6 card assault, or load the arrow from hand to Azalea into that arrow with dominate. Most of our turns can be run off a single yellow pitch, but some can fire with only 1 resource, and in those cases we may even get 6 cards played by the time our turn ends.
Buffing a dominated arrow isn't a hard one to explain, but sometimes the execution can be intricate. Again, Spire Sniping is excellent here, as it gives you perfect information for the 2 cards you're able to easily reach. The key is to remember that the arrow you load with Sandscour may not be the arrow you actually want to fire; when you Sandscour and that top card is exactly what you want, you should load an arrow from hand instead and Azalea into your desired attack.
Defending and setting up is the line of play requiring the most discipline. Despite popular opinion, we're actually pretty decent at blocking, provided we aren't relying on our equipment to do it for us. In some hands, we're capable of going down to 1 card and still making an attack that needs to be answered. But even when all we do is arsenal, that 1 extra card can make a big difference on the following turn. Get comfortable with a rhythm of taking a turn off to achieve a stronger follow-up. Even two turns off, with each gaining us a card in arsenal, doesn't doom our momentum.
A Note on Matchups
I'm not going to get into a detailed matchup guide today, as the first step in mastering this deck is to learn your own play patterns. Also, the Card Advantage guys do a great job of that in their videos- here's that embed I promised.
But I do want to speak to the 3 dominant forces heading up the meta until the next wave of Living Legend.
One of the main incentives to run this deck right now is that it has strong game into Lexi. Red in the Ledger is devastating to the wide attack patterns of the Elemental Ranger, especially on repeat. But beyond that, essentially all of our disruption is relevant here: Inertia, Frailty, Remorseless, Immobilizing, Seek and Destroy, and even Battering Bolt! Additionally, we aren't nearly as susceptible to 'Ranger hands' (aka- bad draws that derail your momentum) as other Ranger builds. With Lexi seeing extremely high representation at major events, you can go a long ways simply by countering her.
Oldhim is a hard matchup for us. But it's not at all an unwinnable one. The Dreadbore package is included in our decklist entirely for Oldhim. Indeed, when the Grandfather of Eternity enters Living Legend, many of the sideboard slots will be freed up. In this matchup, you want to hold Release the Tension and/or Murkmire Grapnel in arsenal until you get both to line up; then fire them together to nail Oldhim with damage he can't get out of. Barbed Undertow and Dead Eye are also extremely effective; Undertow essentially forces him to skip a turn. While you're learning this deck, I'd avoid this matchup in testing; but once you've got a solid handle on your own game, you'll need to put in reps here.
Dromai is, unfortunately, the one matchup that hasn't been solved yet. We're bad at going wide, so racing is really our only option, and it's a race we don't always win. We do have some cards that effectively disrupt Dromai, such as Barbed Undertow; but as Dromai also tends to run prevention effects like Oasis Respite and Sand Cover, we can struggle to land them even with dominate. Current testing involves Sleep Dart (to shut off her hero power) and Down and Dirty (face up in the arsenal, this card becomes a game of chicken with Phantasm attacks). Development continues, but for now, the best advice is to dodge these matchups on your way to the top.
A Dream Realized
To wrap this up on a personal note, those of you who have followed my work for the past 2 years should be well aware of my love for Azalea. And while Death Dealer builds were my entry point, I've long sought to develop and focus on a topdeck strategy that maximized Azalea's unique ability to tutor and disrupt.
I've not been able to pursue high-level play in my own life, and so I haven't been able to do the refinement on this concept myself - it's remained my janky deck for Armories and my hot take in articles. The Azalea community at large has found the majority of its success following the strategies of Levi Rauch, whose mastery of Death Dealer builds has largely dominated the discussion around this hero.
So I'm incredibly grateful to the team at Card Advantage - and Jacob Kissel in particular - for pursuing an alternate path to success with Azalea, and giving me a blueprint I can live vicariously through. I had nothing to do with their work here, but revel in the fact that they arrived at a few ideas I'd also had, while pushing it well past anything I'd had time or brilliance to develop. This piece was written with their blessing, and I hope I've done it justice.